
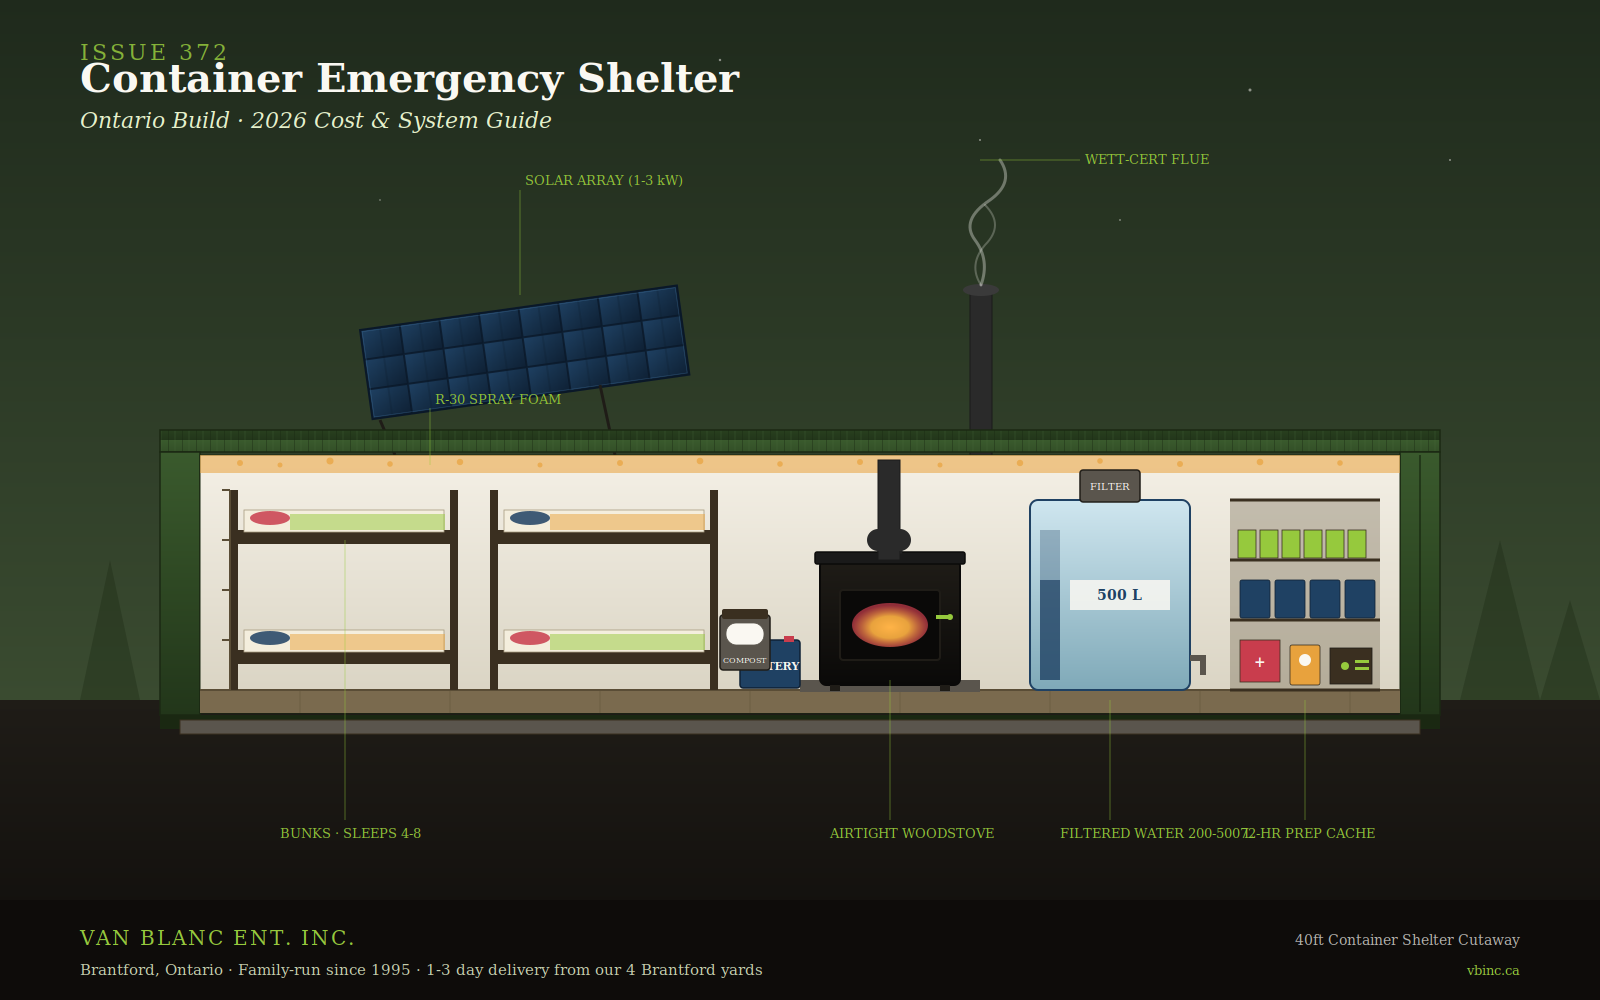
Quick Answer: A shipping container emergency shelter in Ontario can be built either DIY or turn-key in 2026, and the final number is driven by the container grade you start with, how much of the labour you do yourself, and how complete the off-grid systems are. Start with a 40ft Wind & Watertight or a one-trip container, add R-30 spray foam, an airtight woodstove, a 1-3 kW solar array, 200-500 litres of stored water, a composting toilet, and bunks for 4-8 people. Family-run since 1995, cash on delivery, call for a same-day quote tailored to your site.
In This Guide
- Who builds a container emergency shelter?
- What size container is best?
- How do you insulate it for winter?
- Can you put a woodstove in it?
- How much solar does it need?
- How much water should you store?
- Composting or incinerating toilet?
- How do you lay out a 40ft for 4-8 people?
- What drives the cost?
- What order do you build it in?
- FAQs
Reading Time: 14 minutes
Who Actually Builds a Container Emergency Shelter?
A container emergency shelter is a steel shipping container, usually a 40ft high cube fitted out as a cabin, insulated and fitted out with heat, power, water, sanitation, and bunks so four to eight people can stay warm, dry, and supplied for three to fourteen days when the grid, the well pump, or the road fails. It is an outbuilding, not a bunker.
Three kinds of buyers call us about emergency shelter containers, and they each want something different.
The first is the home backup buyer. They have a house in Brant or Norfolk or up near Owen Sound, they have lost power for four days in an ice storm before, and they want a heated, lit, water-stocked outbuilding they can walk to from the back porch when the grid drops. They do not need to live in it. They need it to function the week the power goes out and the well pump stops.
The second is the evacuation cabin buyer. They have a piece of land an hour or two away from where they live, often on a lake or in the bush, and they want a shelter they can drive to if a wildfire pushes them out of a southern town, if a flood takes out their main road, or if they just want to be away from grid dependence for a long weekend in February. This is the off-grid cabin in spirit, even if it never gets called that out loud.
The third is the municipal or community shelter. Small townships, fire halls, and First Nations community organisations have asked us about a hardened steel unit with bunks, a stove, water, and a generator hookup, parked on a lot near the hall, used a few weekends a year for training and held in reserve for the days when a real event lands. We have not built one of those ourselves, but we have supplied the containers for buyers and contractors who have.
Paul LeBlanc, owner: “Most of the preparedness calls we get start the same way. Someone went through a four-day power outage, and they do not want to do it again. They are not paranoid. They are not preppers. They are practical people who already own a chainsaw and a generator, and they want the next layer.”
The Ontario reality this is for
Ontario gets ice storms that take out grid power for a week. Northern Ontario gets cold snaps that hit -30C. Cottage country sees wildfire smoke from the boreal forest most summers. Southern Ontario sees river flooding in spring. None of this is hypothetical. A container emergency shelter is a steel outbuilding designed to keep four to eight people warm, dry, watered, fed, and sane for three to fourteen days when the regular systems fail.
What Size Container Is Best for an Emergency Shelter?
For an emergency shelter you have three real container sizes to choose from, and the right answer almost always lands on a 40ft high cube.
A 20ft container gives you about 160 square feet of interior floor. By the time you have insulated, framed, built bunks for four, fit a woodstove with the required clearances, and stored a week of water, you are out of room. Twenty-footers work for a one or two person bug-out shelter, not a family unit.
A 40ft high cube container gives you 320 square feet and a 9’6″ exterior height (about 8’2″ interior after insulation and ceiling). That extra foot of headroom makes the difference between feeling like you are camping inside a shipping container and feeling like you are inside a small cabin. For most Ontario builds, the 40ft high cube is the right call.
A 45ft high cube buys you another 40 square feet but costs more to deliver and place, and unless you already need that length for a specific layout (twin bunk rooms plus a common area plus a mudroom), the extra five feet mostly adds delivery and placement cost. Most family emergency shelters fit comfortably in 40ft.
For grade, buyers ask us which grade to start with. The answer depends on the budget. A used Wind & Watertight 40ft gets you a sealed shell with cosmetic wear at the lowest cost, while a one-trip 40ft high cube costs more but arrives in essentially new condition. If you are insulating and finishing the interior anyway, the WWT grade saves you money you can put into the systems that actually keep people alive. If the shelter is going to be visible from your house and you care about how it looks, the one-trip is the call. Either way, you can see what we have ready in the yard before you commit to a grade.
How Do You Insulate a Container for an Ontario Winter?
Insulation is where most container shelter builds go wrong. Bare steel in a Brant County February sits at the outside air temperature, and the inside surface condenses moisture all winter long. Without insulation, you have a refrigerator with a woodstove in it. The stove runs, the air heats, the steel pulls the heat back out, and the moisture rolls down the walls onto your gear.
The answer in Ontario is closed-cell spray foam, applied directly to the inside of the corrugated steel walls and ceiling, at a minimum of R-25 and a target of R-30. Closed-cell foam does three things at once: it insulates, it creates a vapour barrier that stops condensation, and it adds shear strength to the container walls.
A 40ft high cube spray-foamed to R-30 takes roughly 25-30 board feet of foam per linear foot of wall plus the ceiling. A professional spray foam application on the inside of a 40ft is one of the larger line items in the build, and the quote moves with the contractor you choose, the R-value you target, and current foam pricing. For an emergency shelter that has to function at -30C without grid heat, building to R-30 buys you headroom. The woodstove can be smaller, the wood pile lasts longer, and the interior temperature stays above freezing overnight when the fire dies down. Pair the spray foam with a thermal mass element, such as a small block of brick or concrete behind the stove, to hold heat through the slow hours.
For the floor, the original marine plywood is treated for cargo work rather than for human habitation. Most builds lay closed-cell foam underneath the container if the foundation allows, or add a layer of rigid foam plus a new subfloor on top of the original deck. The container modification cost guide goes deeper into R-value choices for Canadian climates.
Can You Put a Woodstove in a Shipping Container?
Yes, a woodstove is the right primary heat source for an emergency shelter, and it is the foundation of most off-grid container builds. For a shelter that has to function with no grid power, no propane delivery, and no natural gas line, a properly installed airtight woodstove carries the load. Wood is locally available, storable for years, and burns clean in a modern airtight stove.
For a 40ft high cube insulated to R-30, a small airtight woodstove rated for 800-1,200 square feet is plenty. Common Canadian-made options include the Drolet and Pacific Energy compact models. Budget for the stove itself, plus the WETT-certified flue, roof penetration, and heat shield, since the installed cost is mostly the certified labour and the flue components rather than the stove alone.
The installation has to be WETT-certified to satisfy insurance and most municipal inspections. WETT (Wood Energy Technology Transfer) is the Canadian certification body for solid-fuel-burning appliance installations. A WETT-certified installer will set the stove on a fire-rated hearth pad, ensure the flue penetration through the steel roof is sealed and shielded, maintain the required clearances to combustibles, and issue a certificate you can hand to your insurer.
For backup heat, most shelter builds add a small propane heater (Mr. Heater Buddy or wall-mounted Empire) with a 100-pound propane tank parked outside. The propane runs the heater for a week of continuous use if the wood pile gets wet or runs low. The cost of the propane backup is modest next to the rest of the build and depends mainly on the heater and tank choice.
The thermal mass trick
An airtight woodstove burns hot, then cools fast when the fire dies. A 200-pound block of brick or concrete placed behind the stove on the hearth absorbs heat during the burn and releases it slowly through the night. Buyers who add thermal mass report the shelter holds 15C overnight even after the fire goes out. The brick and concrete cost next to nothing and pay for themselves the first cold night.
How Much Solar Does an Emergency Shelter Need?
Solar in an Ontario emergency shelter is not about running a fridge and a TV. It is about lights, a phone charger, a radio, a low-draw fan to circulate heat from the woodstove, and ideally a small water pump. A modest 1-3 kW system covers all of that comfortably.
The standard preparedness build uses four to eight 300-400W panels mounted on the container roof or on a small ground array. A well-documented off-grid container cabin near Ottawa runs nine 235W panels for a 355 square foot cabin. Most Ontario emergency shelter builds we see land in the 1.5-2 kW range, which is enough headroom for short cold-weather days.
For batteries, lithium iron phosphate (LiFePO4) is the dominant choice in 2026. They handle cold better than lead-acid (though still need to be kept above freezing for charging), last 10-15 years, and have shrunk in cost dramatically. A 5-10 kWh battery bank sized to the build is the usual choice, with the price per kWh varying by brand and chemistry. The bank lives inside the insulated container so it stays in its operating temperature range.
The full electrical package, panels and racking and charge controller and inverter and battery bank and inside wiring, is the second-largest systems cost after spray foam for a typical 1.5-2 kW build, scaling up with the amount of battery storage you choose. ESA (Electrical Safety Authority) certification is required in Ontario for any permanent electrical installation, even off-grid. Use a licensed electrician for the final connection.
What 2 kW of solar actually powers
For a 4-8 person shelter using LED lighting, a low-draw circulation fan, phone and laptop chargers, a radio, and intermittent water pump use, 2 kW of panels paired with a 7-8 kWh battery bank gives you roughly three days of autonomy in cloudy December conditions and full daily replenishment from March through October. Add a propane fridge instead of electric to keep the battery load down for week-long events.
How Much Water Should You Store in a Shelter?
Water storage is the system buyers under-size most often. Public Safety Canada recommends a minimum of two litres of water per person per day for drinking, plus another two for cooking and hygiene, for a 72-hour kit. For a longer event with four to eight people, the math gets serious fast. Eight people at four litres a day for a week is 224 litres just for survival use.
Most emergency shelter builds size water storage at 200-500 litres of potable water on hand. A 500-litre food-grade polyethylene tank fits easily in a corner of a 40ft, is gravity-feedable to a small tap, and costs little relative to the rest of the build. Pair it with a sediment filter and a Berkey-style gravity filter (or a Katadyn pump filter) and you can also process rainwater, snowmelt, or surface water as backup.
The rainwater catchment angle is worth considering for any shelter that has a flat or low-slope roof modification. A 40ft container roof captures roughly 30 litres of water for every millimetre of rainfall (about 90 square metres of catchment). A summer storm can refill your tanks in an afternoon. Add a first-flush diverter to send the first runoff to drain, and a screened intake to keep debris out.
Winter water reality
Stored water freezes. If the shelter is unheated between use windows, your storage tank ruptures the first deep freeze. Either keep the shelter heated to above freezing year-round (the woodstove plus thermal mass plus a small electric resistance heater on the battery), or drain the system between events and refill on use. Most Ontario buyers drain in winter and refill from a hauled drum on activation. Simple, manageable, and avoids cracked tanks.
Composting or Incinerating Toilet: Which Works Off-Grid?
A shelter that runs off-grid for a week needs a sanitation answer that does not involve plumbing or a septic connection. Two real options work in an Ontario container.
A composting toilet (Nature’s Head or Sun-Mar) separates urine from solids and uses peat moss or coconut coir as a cover material. The solids compost over months, the urine is drained off to an external container, and there are no plumbing connections. It is a one-time purchase that lasts indefinitely with basic maintenance. The downside is it needs to be emptied roughly every 60-90 uses, which for a family of four on a week-long activation is one full emptying per event.
An incinerating toilet (Cinderella, Incinolet) burns waste to ash using either propane or electric power. The ash is sterile and is dumped into the regular garbage. A propane unit carries a higher upfront cost than a composting toilet, and you also have to budget for venting through the container roof. The advantage is zero handling of waste between activations. The disadvantage is propane fuel use during operation and a higher upfront cost.
For most emergency shelter builds the composting toilet wins on cost, simplicity, and grid-independence. Buyers who plan to use the shelter regularly (a few weekends a year plus emergencies) often upgrade to the incinerating unit for the convenience.
How Do You Lay Out a 40ft Shelter for 4 to 8 People?
A 40ft high cube laid out for emergency shelter use typically zones into three areas. One end carries the bunks. The middle holds the woodstove, water tank, and toilet. The other end is the common area with a small table, food storage, and the battery and inverter installation.
For sleeping, twin-stack bunks along one or both long walls give you four to eight beds in roughly eight linear feet of container length. Custom-built plywood bunks with a 30-inch mattress (the standard cot size) fit comfortably under the 8’2″ interior height. Storage drawers under the lower bunks add 16-20 cubic feet of gear capacity per bed.
Food and supply storage follows the same logic as a sailboat galley: build vertical, build secure, and label everything. A wall of plywood shelving on the common-area side, with cans and dry goods on the upper shelves, water jugs and heavy goods on the lower shelves, and a 72-hour grab bag for each occupant at the door, covers the supply side of preparedness.
For the framing and interior choices, everything that gets touched when a box is converted at the yard is covered in more depth, from door cuts to insulation methods to interior fit-out. If you would rather have the cutting and conversion finished before delivery, that work can be done at the Brantford yard before delivery.
What goes on the shelves
The Canadian Red Cross and Public Safety Canada’s 72-hour preparedness guide both recommend the same basic supply list. Non-perishable food (rotated every 6-12 months), bottled water (rotated every 12 months), a first-aid kit, a hand-crank radio, flashlights and spare batteries, a tool kit, and copies of important documents in a waterproof bag. For a longer-event shelter, scale that up to a 14-day stockpile and add a chainsaw, fuel for the saw, a water filter, and spare clothing for the season you are in.
Ready to price your container?
Tell us the size and your postal code and we’ll send back an all-in number, container, delivery, and placement, usually within 1-3 days. No pressure, no mystery fees.
Family-run in Brantford since 1995 · 200+ containers in stock · 4.9★ across 140+ Google reviews · every box graded by a person, walk it before it lands.
What Drives the Cost of a Container Emergency Shelter?
The cost of an Ontario container emergency shelter is driven by three things: the container grade you start with, how much of the labour you do yourself, and how complete the off-grid systems are. The table below shows how those choices stack into realistic build tiers, from a bare-bones DIY shell to a turn-key full build.
| Tier | What you get | What drives the cost up or down |
|---|---|---|
| Bare-bones DIY | Used WWT 40ft container, DIY insulation (rigid foam or owner-installed spray foam), small woodstove, propane heater, jerry cans for water, bucket composting toilet, plywood bunks | Lowest cost. Used WWT shell and owner labour keep it down. Cost rises if you hire out the insulation or upgrade the heat source. |
| Mid-tier DIY | Used CW or one-trip 40ft, professional spray foam to R-25, WETT-certified airtight woodstove, basic 1 kW solar + 5 kWh battery, 200 L water with filter, composting toilet, finished interior | Moderate. Professional spray foam and a small solar bank are the main additions over bare-bones. Container grade and battery size set the spread. |
| Turn-key full build | One-trip 40ft high cube, R-30 spray foam, WETT-certified stove + propane backup, 2 kW solar + 8 kWh battery, 500 L water + rain catchment, incinerating toilet, finished interior with bunks for 6-8, ESA-certified electrical, helical pier foundation | Highest. New one-trip shell, larger solar and battery, certified electrical, and contractor labour throughout. Battery capacity and finish level drive the top end. |
The container itself is only a fraction of the total. The systems (insulation, heat, power, water, sanitation) account for most of it. The big variables are whether you DIY the insulation and interior carpentry, which is where the largest savings come from, whether you go with new or used grade for the shell, and how much battery storage you want.
If you are planning a phased build, a walk-through of what each upgrade adds breaks the systems down one feature at a time so you can stage the spend.
Paul LeBlanc: “The Facebook listings for shelter containers, fully built, fully off-grid, are the same scam pattern we see on every other container category. A finished shelter is the steel shell plus a long stack of insulation, heat, power, water, and sanitation systems on top. Anyone offering a complete shelter far below what those systems actually cost is selling you a problem. People call us saying they found a bin and a build for a fraction of the going rate on Facebook. Two weeks later they call back saying they got scammed. Real pricing protects you.”
What Is the Right Order of Operations on the Build?
The order of operations on a container shelter build matters, because doing things in the wrong sequence makes later steps cost more or fail outright. The build runs in seven steps, from site prep through provisioning.
Step one is site selection and foundation. The shelter needs to sit level, drain water away from the steel, and be accessible by tilt-deck truck for delivery. Helical piers or a gravel pad work for most Ontario sites. We walk through how piers and pads stack up for an Ontario site if you are deciding between the two.
Step two is the container delivery from our 4 Brantford yards on a tilt-deck trailer, with a 1-3 day lead time across most of Ontario. Site prep needs to be done before the truck arrives, and it helps to know what the tilt-deck drop looks like on the day so the pad is ready for the load. Every quote comes with a real lead time.
Step three is the modifications that require cutting steel: door cuts if you want a second door, window cuts if you want natural light, vent cuts for the stovepipe and toilet vent, and the solar penetration for cables. All cutting is done before insulation, because steel work after spray foam means scraping foam off and re-applying.
Step four is the insulation. Spray foam application is a single-day job for a 40ft if access is clear. Cure time is 24-48 hours before you can build inside.
Step five is the interior framing and finish: bunks, shelving, floor, ceiling, and wall finishes if you want them.
Step six is the systems install: woodstove with WETT certification, solar with ESA certification, water tank and plumbing, composting or incinerating toilet, propane backup heat.
Step seven is provisioning: water, food, first aid, tools, and the documentation binder. This is the step most builders forget to schedule, and it is the one that determines whether the shelter actually works when you need it.
Frequently Asked Questions
How much does a container emergency shelter cost in Ontario in 2026?
It depends on three things: the container grade you start with, how much of the labour you do yourself, and how complete the off-grid systems are. A bare-bones DIY build with a used shell and owner-installed insulation sits at the bottom, a mid-tier DIY build with professional spray foam and basic solar sits in the middle, and a turn-key full build with a one-trip container, R-30 insulation, a certified woodstove, 2 kW solar, and full water and sanitation systems sits at the top. The container itself is only a fraction of the total. The systems make up the rest, so the best way to get a real number is a quote tailored to your site.
What size container is best for an emergency shelter for a family?
A 40ft high cube is the right call for most family emergency shelters. It gives you 320 square feet, 9’6″ exterior height (about 8’2″ interior after insulation), and enough room to zone for sleeping, heat and sanitation, and a common area with food and supply storage. A 20ft works for one or two people. A 45ft adds 40 square feet but is rarely worth the extra delivery cost.
How much insulation do I need for an Ontario container shelter?
Target R-30 with closed-cell spray foam applied directly to the inside of the steel walls and ceiling. Closed-cell spray foam also acts as a vapour barrier and adds shear strength to the container walls. A professional application on a 40ft is one of the larger line items in the build, with the cost moving on the R-value you target, the contractor, and current foam pricing.
Can I install a woodstove in a shipping container?
Yes, and it is the foundation of most off-grid emergency shelter builds. The installation has to be WETT-certified to satisfy insurance and most municipal inspections. A small airtight woodstove rated for 800-1,200 square feet works for a 40ft insulated to R-30. The installed cost covers the stove, the WETT-certified flue, the hearth pad, and the heat shield, and most of it is the certified labour and flue components rather than the stove itself.
How much solar power do I need for a shelter for 4-8 people?
A 1.5-2 kW solar array paired with a 5-10 kWh lithium iron phosphate battery bank covers lights, phone and laptop charging, a low-draw circulation fan, radio, and intermittent water pump use for four to eight people. The full electrical package covers the panels, racking, charge controller, inverter, batteries, and ESA-certified wiring, and the battery capacity you choose is the biggest factor in what it costs. ESA certification is required in Ontario even for off-grid installations.
How much water should I store in an emergency shelter?
Public Safety Canada recommends two litres per person per day for drinking plus another two for cooking and hygiene. For eight people over a week that is 224 litres. Most shelter builds store 200-500 litres of potable water in a food-grade polyethylene tank. Pair it with a sediment filter and a gravity filter (Berkey or similar) so you can process rainwater, snowmelt, or surface water as backup.
Composting toilet or incinerating toilet?
For most Ontario shelter builds the composting toilet wins on cost, simplicity, and grid-independence. The downside is emptying every 60-90 uses. An incinerating toilet, which costs more upfront and needs venting through the roof, burns waste to sterile ash and needs no handling between events, but uses propane or electric power during operation. For a shelter used a few weekends a year plus emergencies, many buyers step up to the incinerating unit for the convenience.
How long does it take to build a container emergency shelter?
From container delivery to functional shelter, expect six to twelve weeks for a turn-key build with contractors handling spray foam, woodstove installation, and electrical. DIY builds run three to six months depending on time available. The most common delay points are foundation prep, WETT certification scheduling, and ESA inspection lead times. Plan the build in spring and summer so the foam can cure in warm weather and the woodstove installation is done before fall.
Can Van Blanc deliver the container to a remote property?
We deliver across Ontario from our 4 Brantford yards in 1-3 days for most of the province. For long-haul routes to Eastern Ontario or Northern Ontario, lead times stretch to 3-10 days depending on the route. The container arrives on a tilt-deck trailer and needs a level, dry, accessible site. Every quote we give comes with a real lead time.
Sources
- Green Energy Futures. (2024). Welcome to the Octopod: An off-grid, solar powered shipping container cabin in Bobcaygeon, Ontario. greenenergyfutures.ca
- Public Safety Canada. (2025). 72 Hours: Is your family prepared?. getprepared.gc.ca
- Government of Ontario. (2024). Building Code (O. Reg. 332/12). ontario.ca/laws/regulation/120332
- Wood Energy Technology Transfer (WETT) Inc. (2025). Solid Fuel Burning Appliance Installation Standards in Canada. wettinc.ca
Reach Van Blanc in Brantford
We have been supplying shipping containers across Ontario since 1995. Our warehouse is at 90 Morton Avenue E in Brantford, and we deliver from our 4 Brantford yards across the province in 1-3 days on a cash-on-delivery basis. No surprise fees, no chase-the-paperwork. Every quote we give comes with a real lead time.
Van Blanc Ent. Inc. · 90 Morton Ave E Unit 1B, Brantford, ON N3R 7J7 · 519-754-6844 or toll-free 1-888-509-6658
If you are planning an emergency shelter build, come to the yard before you order. Walk a few 40ft high cubes, see the difference between Wind & Watertight and one-trip grade in person, and we will talk through what works for your site, your insulation plan, and your timeline. Worth the drive for the quality and family customer service with 30 years of experience.
Before delivery day, make sure the spot is level, drains water away from the steel, and is reachable by a tilt-deck truck. Tell us your site details when you call and we will flag anything that needs prep before the load arrives.