
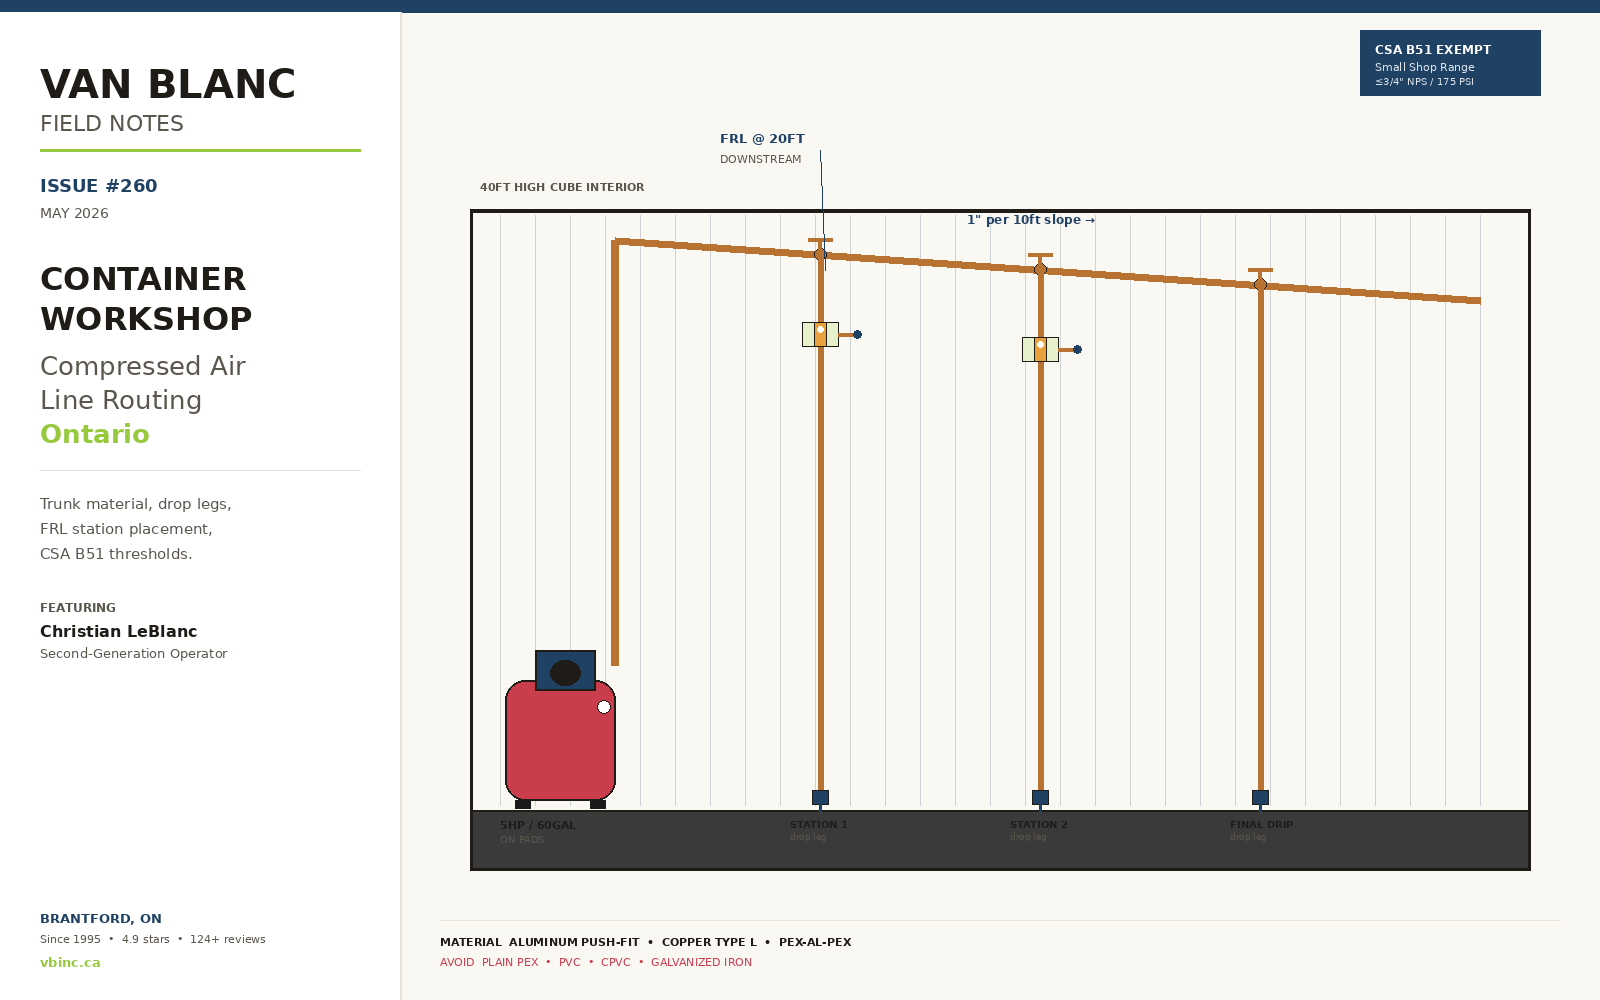
Quick Answer: Container workshop compressed air line routing in Ontario means a sloped main trunk near the ceiling, vertical drop legs with bottom-drain ball valves, an FRL station at least 20 feet downstream of the tank, and aluminum or copper trunk lines rated for the pressure. For most 20ft conversions and 40ft shop conversions, a 5 to 7.5 HP single-phase compressor paired with a 3/4-inch trunk runs the typical tool fleet without starving it. Real Brantford yards, real reviews (4.9 stars across 140+ Google reviews), real 1-3 day delivery across Ontario. Family-operated since 1995.
In This Guide
- Why Does Routing Matter More Than the Compressor Itself?
- What Pipe Material Should You Use for Workshop Air Lines?
- How Do You Lay Out the Main Loop in a 20ft or 40ft Shell?
- What Are Drop Legs and Drip Legs, and Why Do They Matter?
- Where Should the FRL Station Go in a Container Workshop?
- How Do You Size the Trunk to the Compressor and Tools?
- Where Should the Compressor Sit Inside the Container?
- Does Ontario Regulate Workshop Air Piping Under CSA B51 and TSSA?
- What Is the Install Sequence and Pressure Test?
- How Does Van Blanc Support a Workshop Build From the Yard?
- Frequently Asked Questions
Reading time: about 13 minutes.
Why Does Routing Matter More Than the Compressor Itself?
Compressed air line routing matters more than the compressor because pressure is lost in the pipe rather than the pump. A 5 HP compressor feeding a clean, sloped, properly drained trunk will out-perform a 7.5 HP unit feeding a kinked floor hose. Sizing, slope, and drainage decide how much air actually reaches the tool.
Buyers come to our Brantford yard already convinced the compressor is the hard decision, asking whether 5 HP or 7.5 HP will run their tools. The compressor is the easy part. The hard part is the steel and copper between the tank and the tool. That is why air line layout sits at the centre of any workshop conversion we walk through with a buyer, and why we treat it as inseparable from the rest of our full container workshop conversion guide.
Paul LeBlanc, owner: “In my thirty years in containers I have watched more shop builds fail on the air line than on the compressor. A man spends his money on horsepower, runs a rubber hose along the floor, and wonders why his sander dies under load. The compressor was never the problem. The pipe was. Get the routing right and a modest compressor feels twice its size.”
Inside a shipping container the interior dimensions of a sea can are fixed: 7-foot-10 interior width, 8-foot interior height on a regular cube, 40-foot run end to end. Every fitting, every elbow, every undersized pipe shows up as pressure drop you cannot fix by buying a bigger compressor later. This guide walks the whole decision: material, trunk diameter, slope, drop legs, FRL placement, compressor corner, regulatory backdrop, and install sequence.
What Pipe Material Should You Use for Workshop Air Lines?
Pipe material for a container workshop air line comes down to three rated options, aluminum push-to-connect, copper Type L, and PEX-Al-PEX composite, plus one common online recommendation, plain PEX, that you must avoid entirely. Material choice is the first decision and it constrains everything downstream, from labour time to how easily you can re-route a leg later.
| Trunk material | Install method | Re-routing | Best fit in a container shop |
|---|---|---|---|
| Aluminum push-to-connect | Cut, deburr, push (no tools or flame) | Easy, fittings reusable | Most 20ft and 40ft conversions; one-afternoon install |
| Copper Type L | Braze each joint | Cut and re-braze | High-end builds with exposed steel walls where the trunk reads as premium plumbing |
| PEX-Al-PEX (MaxLine type) | Crimp or push fittings | Moderate | DIY buyer with no soldering skill; value middle ground |
| Plain PEX / PVC / CPVC | Not rated for air | Do not use | None: fails by shrapnel-burst, never use for compressed air |
Materials Rated for Compressed Air Service
Aluminum push-to-connect (RapidAir MaxLine, Prevost, Atlas Copco AIRnet) is the easiest install: cut, deburr, push. The aluminum trunk is rated for air, resists internal corrosion, fittings are reusable. Copper Type L handles the pressures cleanly when brazed, but labour cost is higher and re-routing means cutting and re-brazing. MaxLine-style multilayer (HDPE-aluminum-HDPE) is engineered for compressed air pressure and resists oil contamination. Standard PEX is NOT rated for compressed air by any manufacturer and fails by shrapnel-burst rather than slow leak. Never use plain PEX, PVC, or CPVC.
For most of the container workshops we deliver into the Hamilton, Brantford, Kitchener and Niagara corridor, aluminum push-to-connect is the right call. It installs in a single afternoon, the fittings are reusable, and the trunk is light enough that one person on a stepladder can route it. Copper makes sense for a high-end conversion with exposed steel walls where the trunk reads as premium plumbing. MaxLine sits between the two on cost and is the value choice for a DIY buyer with no soldering skill.
Skip the iron and galvanized steel runs older garage guides recommend. Inside a sealed container the condensation problem is severe enough that black iron will rust internally within a couple of seasons and shed scale into your tools. Container interiors stay humid because the steel walls condensate against the outside air temperature differential. Your trunk material has to handle that condensate without corroding from the inside.
How Do You Lay Out the Main Loop in a 20ft or 40ft Shell?
The main air loop in a container shell runs near the ceiling, sloped, with drops coming down at each work station. The physics drive that layout: hot wet air leaves the compressor, rises naturally, cools as it travels through metal pipe, and the condensate drains downhill toward a collection point. Trunk run flat or sloped the wrong direction means water pockets that migrate to your tools.
Inside a 20ft shell a single straight run with one or two drops handles most workshops. Inside a 40ft shell we recommend a true loop: trunk runs down one wall, across the back, and back up the other wall, so any drop on the loop has air arriving from two directions. The loop layout cuts pressure drop in half compared to the dead-end run, and gives you redundancy if you need to isolate a section for repair.
Slope the Trunk One Inch Per Ten Feet, Away From the Compressor
The trunk slopes downward away from the compressor at roughly one inch per ten linear feet. That slope lets condensate roll toward a final drop leg with a drain. Mark the slope before mounting the first hanger. A laser level on a tripod gets you there in five minutes. The common mistake we see is slope-running the wrong direction so condensate drips back into the tank line.
Hangers go every four to six feet on aluminum trunk; copper can run six to eight feet because it is stiffer. Mount hangers into corrugation peaks rather than valleys, and use rubber-isolated hangers where possible to keep compressor vibration out of the trunk.
What Are Drop Legs and Drip Legs, and Why Do They Matter?
A drop leg is a vertical pipe coming down from the trunk to tool-height, with the take-off for the FRL branching from the TOP of the drop leg rather than the bottom. Every workstation needs one. Water runs down the inside by gravity. The bottom is a sealed pocket with a quarter-turn ball valve. Bleed it at the start of each work day and collected condensate drains to a bucket. The take-off at the top sends dry air to the tool.
This is the single most-skipped detail in DIY container workshop installs. People run the trunk fine, then take a feed off the bottom of the trunk straight to their FRL, and within a month the FRL is full of water, the regulator is fouled, and the impact gun spits droplets that fish-eye the paint job. The drop leg is not optional. It is the entire reason the trunk slopes.
Drip legs at low points serve the same function for the trunk. If you step the trunk up over a doorway, the rise creates a low point on the far side. That low point gets a drip leg with a ball valve. Quincy Compressor and the major industrial air suppliers teach this layout because it has been standard since the Korean War era.
Real Container Workshop Routing, 40ft High Cube
A Norfolk County buyer bought a 40ft HC from the yard for a custom shop conversion last summer. Their contractor routed a 3/4-inch aluminum loop from the compressor corner (door end, on a vibration pad) along the south wall, across the back, and along the north wall to a final drip leg. Drop legs at three work stations: welding bay (regulator only, no lubricator, because welding needs dry air), grinding station (full FRL), paint prep (FRL plus inline desiccant dryer). Total: about six hours of two-person labour after the compressor was already in place.
Where Should the FRL Station Go in a Container Workshop?
The FRL station belongs at least 20 feet of pipe downstream of the tank, mounted on the take-off at the top of each work-station drop leg. The FRL (Filter, Regulator, Lubricator) is the conditioning station between trunk and tool. The filter strips condensate, oil mist, and particulates. The regulator drops trunk pressure (120 to 175 PSI) to the working pressure the tool wants (usually 90 PSI for automotive air tools). The lubricator injects atomized oil for tools that need it.
Placement matters. The FRL should sit at least 20 feet of pipe downstream of the tank discharge. That distance gives air enough cooling time that moisture condenses out of vapour into droplets the filter can catch. Mount it closer than 20 feet and the filter passes vapour straight through, condensing it on the warm side of the regulator. Major pneumatic suppliers publish the same guideline: cool the air first, then filter it.
We recommend per-station FRLs for container workshops because the trunk length is short and the per-station unit lets each tool run at its own pressure setpoint. The 60 PSI you want for an air sander and the 110 PSI you want for an impact gun should not come off the same regulator.
Christian LeBlanc, second-generation operator: “The guys who think they are saving money by putting one big FRL at the compressor and running raw line to every station end up with three different problems within a year. The sander gets too much pressure and the discs disintegrate. The impact gun gets too little because the regulator droops under sustained draw. And the paint gun gets water at the worst possible moment. Per-station FRLs add a little to the parts list across a 40ft shop. They are the cheapest insurance you will buy.”
How Do You Size the Trunk to the Compressor and Tools?
You size the trunk by the highest CFM demand you will ever pull through it rather than the average. Trunk diameter follows that peak draw. Sit down with the tool list, write the CFM rating of each tool at its working pressure, identify the largest single draw (or the realistic simultaneous-tool maximum if two people will work at once), and apply a 1.5 multiplier for headroom. That is your design CFM. Match the trunk diameter to that flow at the trunk length you are running.

| Tool | CFM at 90 PSI | Trunk size |
|---|---|---|
| Air ratchet / small impact (3/8″) | 3-5 | 1/2″ up to 25 ft |
| 1/2″ impact gun | 5-7 | 1/2″ up to 25 ft |
| Die grinder / cut-off tool | 5-8 | 3/4″ |
| Random orbital sander | 6-9 | 3/4″ |
| HVLP paint gun | 11-14 | 3/4″ dedicated |
| Plasma cutter (air feed) | 5-7 | 3/4″ |
| Sandblaster (small cabinet) | 10-20 | 1″ for sustained |
| Air-fed welding helmet | 6-8 continuous | 3/4″ dedicated drop |
For 80 to 90 percent of container shop conversions we deliver, a 3/4-inch trunk handles every tool in the typical fleet. The buyer with a heavy sandblasting habit or HVLP paint operation steps up to 1-inch trunk and pays for it once. Undersizing is the most common single mistake because 1/2-inch fittings are cheaper and the math looks fine for a single tool. Under sustained two-tool draw the pressure drop across a 1/2-inch run at 40 feet eats your tool performance.
A 5 HP single-phase reciprocating unit delivers roughly 14 to 17 CFM at 90 PSI in real field conditions (manufacturer ratings are optimistic). A 7.5 HP single-phase pushes that to 20 to 24 CFM. For a one-person workshop running one tool at a time, 5 HP is plenty. For a two-person operation or sandblasting work, step to 7.5 HP and a 60 to 80 gallon tank. The tank matters more than people credit: a big tank lets the compressor cycle less and gives the FRL a steady supply during demand spikes.
Where Should the Compressor Sit Inside the Container?
The compressor sits in the corner closest to the door, on isolation pads, with its own dedicated ventilation. Where the compressor sits matters for vibration, heat dissipation, and intake air quality. Wrong corner and you will hear it through your house walls from across the yard, the unit will run hot and shorten its motor life, and the intake will pull in grinding dust and shorten the pump life.
Vibration is solved with isolation pads under each compressor foot. Rubber is standard, cork is acceptable, and 7.5 HP units sometimes get a small concrete inertia pad. The container floor is plywood over steel cross-members and transmits vibration efficiently. Pads break that path. Industrial Air Power and Fluid-Aire Dynamics publish guidance and the pads are cheap compared to the noise reduction they deliver.
Heat is solved with airflow. A reciprocating compressor under sustained load climbs 15 to 25 degrees C above outside ambient within an hour. Vent the corner specifically: louvered intake low on the wall behind the unit, powered exhaust fan high on the opposite wall pulling air through.
Intake air should NOT be the air inside the shop. Pulling shop air through the pump cycles every grinding spark, paint mist, and sanding dust through your air system and into your tools. Run an intake extension to outside air through the wall with a proper filter housing. Most reciprocating compressors have a 1-inch or 1-1/2-inch intake that accepts a flexible hose extension.
Does Ontario Regulate Workshop Air Piping Under CSA B51 and TSSA?
Ontario regulates pressure piping through the Technical Standards and Safety Authority (TSSA) under the Boilers and Pressure Vessels Act, with CSA B51 as the adopted reference standard. Most small workshop systems fall under an exemption. Most workshop systems do not require registration: small shop systems with NPS 3/4 inch or smaller trunk, operating below CSA B51 Part 1 design thresholds, generally fall under exemption.
When TSSA Registration Becomes Relevant
Standard compressor packages on container conversions, 60-gallon tank, 175 PSI peak, 3/4-inch trunk, sit comfortably in the exempt zone. A 240-gallon receiver with a multi-stage industrial compressor for a commercial sandblasting business needs a TSSA review under the CSA B51 Code Adoption Document. Threshold language lives in CSA B51:19 and the TSSA amendments.
The CSC plate question that comes up on container conversions is separate. The CSC plate certifies the container for international shipping rather than its contents. Modifying it into a workshop matters only if you intend to ship the container internationally afterward. For a permanent shop on your property, the CSC plate is not a constraint.
What Is the Install Sequence and Pressure Test?
The install sequence for a container workshop air line, refined across hundreds of container workshop builds since 1995, runs in this order:
First, mount the compressor on isolation pads in its assigned corner, with the intake extension through the wall. Wire the electrical (a 5 HP single-phase wants a dedicated 240V 30-amp circuit; a 7.5 HP usually wants 240V 40-amp). The electrical work ties into broader power distribution, and the same discipline that goes into a proper yard-built conversion package applies here: do it once, do it right, no extension cords as permanent solutions.
Second, lay out the trunk with slope marked on the wall in chalk. Mount the hangers. Cut the trunk to length and push-fit (aluminum) or braze (copper). Install the drop legs at each work station with the ball-valve drain at the bottom and the take-off at the top.
Third, mount the FRL stations on the drop-leg take-offs. Use the manufacturer’s recommended orientation: filter bowl downward so condensate drains naturally, regulator with the gauge visible from your standing position at the tool.
Fourth, pressure test. With the compressor disconnected, pressurise the trunk and FRL chain to 150 PSI and hold for 30 minutes. A small drop is normal (air cools, pressure follows). A drop greater than 5 to 7 PSI means a leak. Spray every joint with soapy water, find it, fix it, re-test.
Fifth, connect to the compressor, run the system through a full cycle, bleed every drop leg at the ball valves, and let it run an hour while you watch for abnormal noise, vibration, or heat from the compressor corner. That hour is the burn-in. If something is going to fail early, this is when it tells you.
How Does Van Blanc Support a Workshop Build From the Yard?
Van Blanc supports a workshop build by walking the air line layout with you on a real bin before delivery rather than after. We have been delivering shipping containers across Ontario since 1995. Paul started Van Blanc in 1995. Thirty years later Christian works the yard daily alongside him, having grown up around the Brantford yard. That continuity is the difference between sketching the compressor corner on paper and marking it on the steel you are about to own.
We deliver 20ft and 40ft dry boxes, 40ft High Cubes, and 45ft High Cubes from our 4 Brantford yards in 1-3 days to most of Ontario. The grade for a workshop is typically One-Trip (essentially new, 25-year life) or Cargo Worthy if budget is tighter, and Wind & Watertight works for a covered shop where appearance matters less. What moves the number on a workshop-bound box is size, grade, delivery distance from Brantford, and where the steel market sits that month, so we quote each build per order rather than posting a figure that goes stale. You can browse the boxes we keep ready to convert on the boxes we keep ready to convert.
Many workshop-bound buyers raise the air-line plan during the yard visit. Air lines are the buyer’s contractor’s job, sized to the tool list. We walk through the layout in the yard, mark where the compressor corner should sit relative to the door, and point you toward what your electrician will need if electrical work runs in the same window. The same eye that catches a poorly planned bench and vise anchoring scheme catches an air line about to be routed the wrong way, and thirty years of conversion work at the Brantford yard means we have watched both the good builds and the bad ones happen.
The cheaper bin on Facebook Marketplace will not be the bin you build a workshop into. People call us all the time saying a Facebook listing looks far cheaper than a real quote. Two weeks later the call back is always the same: the bin never showed, the deposit is gone. That pattern is consistent across 30 years, and it is exactly the kind of marketplace container scam Paul has watched repeat through every market cycle.
Ready to price your container?
Tell us the size and your postal code and we’ll send back an all-in number, container, delivery, and placement, usually within 1-3 days. No pressure, no mystery fees.
Family-run in Brantford since 1995 · 200+ containers in stock · 4.9★ across 140+ Google reviews · every box graded by a person, walk it before it lands.
Frequently Asked Questions
Can I use PEX for compressed air lines in a container workshop?
No. Standard PEX is rated for water, not compressed air, and no PEX manufacturer warranties it for air service. PEX-Al-PEX composites like RapidAir MaxLine are different: the aluminum layer handles cyclic pressure. Use MaxLine, aluminum, or copper. Never plain PEX, PVC, or CPVC.
What size compressor do I need for a 40ft container workshop?
A 5 HP single-phase reciprocating compressor with a 60-gallon tank handles most one-person workshops. Step to 7.5 HP and 80 gallons for a two-person operation or sustained sandblasting or HVLP paint work. Single-phase 240V residential service supports up to 5 to 7.5 HP.
How do I keep moisture out of my container shop air lines?
Slope the trunk one inch per ten feet downhill from the compressor, install drop legs at each workstation with the take-off at the top and a ball-valve drain at the bottom, and place the FRL filter at least 20 feet of pipe downstream of the tank so air has cooled enough to condense moisture out before the filter catches it.
Does my container workshop air system need TSSA registration in Ontario?
Most small workshop systems sit in the CSA B51 exempt range: under roughly NPS 3/4 inch pipe, under 175 PSI peak, serving a private workshop. Larger industrial setups with bigger receivers and higher pressures need TSSA review under the Code Adoption Document. Confirm thresholds with the current CSA B51 standard.
Where should the compressor sit inside the container?
The corner closest to the door, on vibration isolation pads, with a louvered intake low on the wall behind the unit and an exhaust fan high on the opposite wall. Run the intake hose to outside air through the wall. The compressor corner needs its own ventilation distinct from general shop airflow.
How long does it take to install compressed air lines in a 40ft container?
Two people, aluminum push-to-connect trunk, three work-station drops with FRLs: roughly six to eight hours of labour after the compressor is set on pads and wired. Copper runs longer because brazing each joint takes more time. Pressure testing adds another hour.
What working pressure should I set the regulator to?
Each tool has a manufacturer-specified working pressure on its label, usually 60 to 110 PSI. Impact guns want 90 to 110 PSI. Sanders want 60 to 90 PSI. HVLP paint guns want 25 to 50 PSI at the cap. Per-station FRLs let each tool run at its spec. One main regulator forces a compromise.
Can the container shell itself be used as an air tank?
No. The container shell is not a pressure vessel. CSA B51 and TSSA do not certify shipping container hulls for compressed air storage. Use a proper ASME-coded tank rated for working pressure.
How do I drain condensate from my air system regularly?
Open the ball valves at the bottom of each drop leg and the final drip leg, once at the start of each work day. Open the tank drain on the compressor daily for heavy use or weekly for light use. Letting condensate accumulate is the largest single cause of internal rust and FRL filter failure.
What grade of container should I buy for a workshop conversion?
One-Trip if budget allows: essentially new, clean walls, 25-year life. Cargo Worthy if budget is tighter and you can live with surface cosmetic wear. Wind & Watertight works for a covered shop where appearance matters less. Visit the Brantford yard to walk the bin before you buy.
Sources
- CSA Group. (2024). CSA B51:19 (R2024) Boiler, pressure vessel, and pressure piping code. csagroup.org
- Technical Standards and Safety Authority. (2024). Boilers and Pressure Vessels Code Adoption Document Amendment BPV-24-01. tssa.org
- Quincy Compressor. (2024). The Best Ways to Dry Compressed Air. quincycompressor.com
- RapidAir Products. (2025). Best Pipe for Compressed Air Transport: Copper, Black, or Aluminum Blue. rapidairproducts.com
- VMAC Air. (2025). What Is An FRL Filter Regulator Lubricator. vmacair.com
Reach Van Blanc in Brantford
We have been supplying shipping containers across Ontario since 1995. Our warehouse is at 90 Morton Avenue E in Brantford, and we deliver right across the province on a cash-on-delivery basis. No surprise fees, no chase-the-paperwork.
Van Blanc Ent. Inc. 90 Morton Ave E Unit 1B, Brantford, ON N3R 7J7 +1 888-509-6658
If you are sizing a workshop build inside a 20ft or 40ft container, come walk the yard with Christian before you take delivery. We will sketch the compressor corner, mark the trunk route on a real bin, and you will leave knowing exactly where the air line is going to run.