
Standard reference: Business Development Bank Canada, Equipment Loan.
Quick Answer: The 7 Customization Cost Traps That Blow Container Budgets in Canada
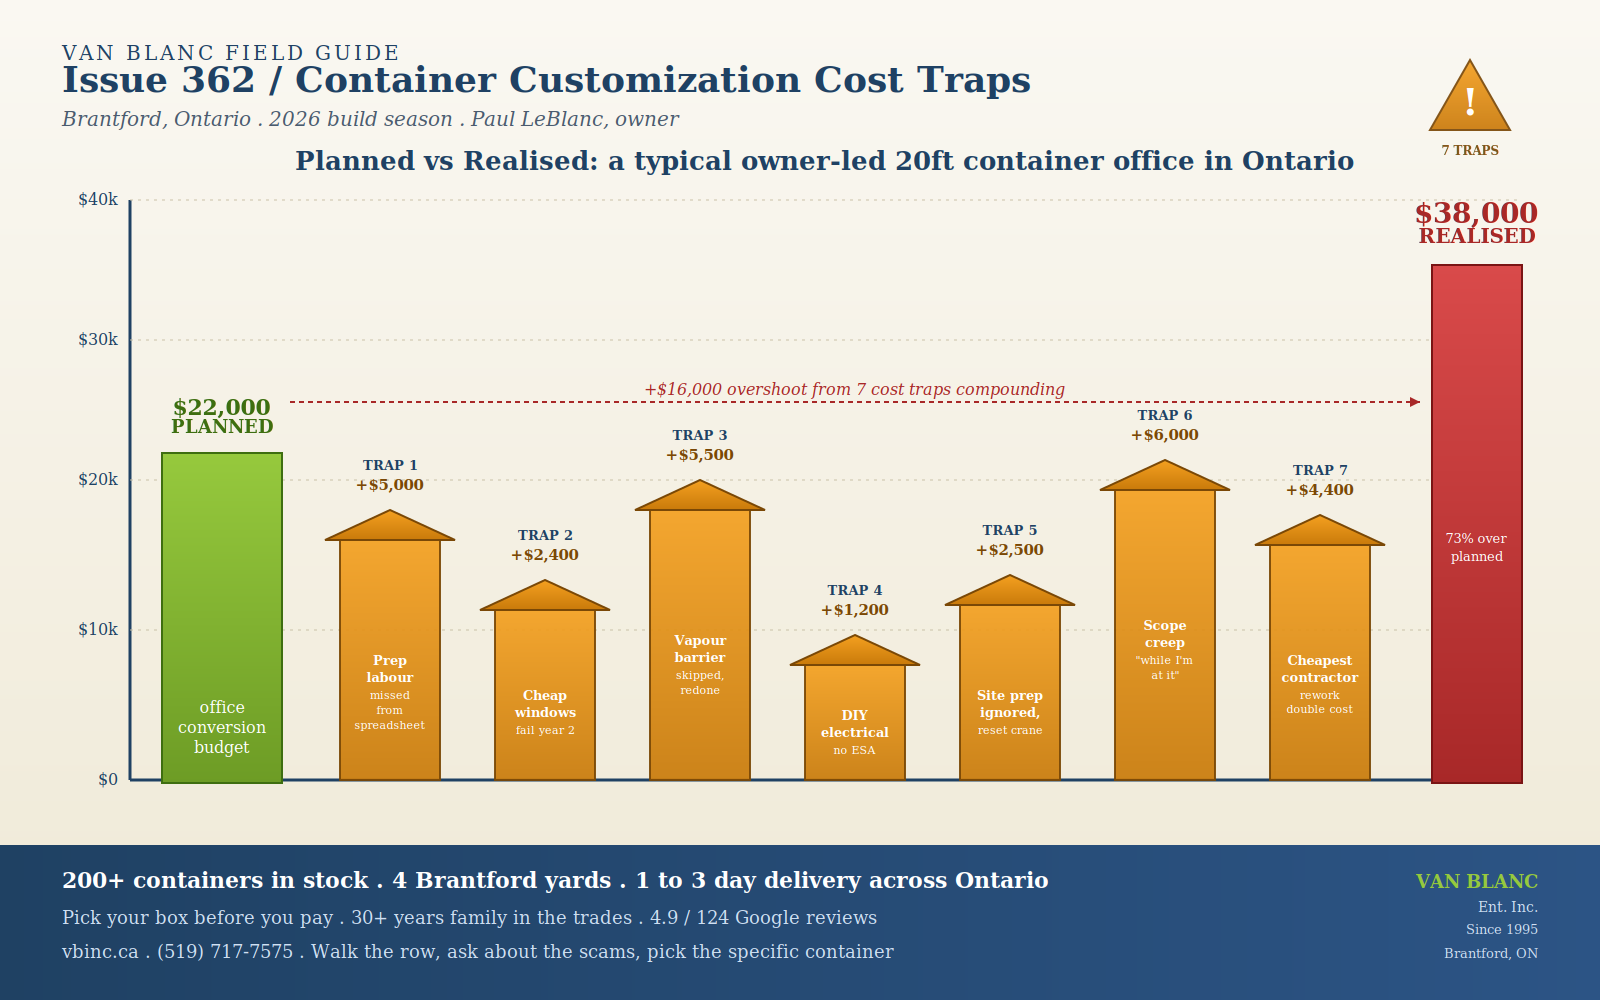
Container conversion projects in Canada overshoot the original budget by 50 to 100 percent in roughly seven out of every ten owner-led builds we have watched come back through the yard. The pattern is seven smaller traps that compound rather than one big surprise. Trap 1 is underestimating prep labour, which carries 40 to 50 percent of the real conversion cost. Trap 2 is buying cheap residential windows and doors that fail by year two against the corten steel cycle. Trap 3 is skipping vapour barrier and condensation control, then ripping out finished interior work to redo it. Trap 4 is DIY electrical without an Electrical Safety Authority inspection, which blocks insurance and resale. Trap 5 is ignoring site prep, so the container settles, doors bind, and the roof pools water. Trap 6 is “while I am at it” scope creep, the silent killer that adds 30 to 40 percent in unbudgeted features. Trap 7 is hiring the cheapest contractor, where rework costs double the original quote. Van Blanc supplies containers from our 4 Brantford yards with 200+ in stock and 1 to 3 day delivery, and we walk every buyer through these traps before they sign. Call 519-754-6844 or come pick your specific box before you pay.
A container customization cost trap is a predictable mistake that pushes a conversion budget past plan. The seven biggest ones are underestimating prep labour, cheap windows and doors, skipped vapour barrier, uninspected electrical, ignored site prep, scope creep, and the cheapest contractor. Each compounds the next, which is why budgets overshoot.
This is the article we wish every customer had read before they showed up at the yard with a half-finished conversion and a question about why the budget doubled. Paul and the family have been in containers for thirty years. “The box is the cheapest part of a conversion,” Paul says. “People budget for the steel and forget the labour, and that is where the project goes sideways.” The cost overruns come from seven repeated mistakes, made in roughly the same order, by roughly the same kind of confident DIY builder. The point of this guide is to set realistic expectations up front so the project finishes inside the budget instead of stalling at 70 percent done with most of the money already spent. If you want the conversion picture from the supply side, see how we approach turning a plain box into a finished space, and the build-outs we complete at the Brantford yard before delivery.
Trap 1: Why Does Prep Labour Wreck Container Conversion Budgets?
Prep labour is the first and largest container customization cost trap, and it is mental. The buyer sees the container, sees the finished conversion in a photo, and prices the gap between them as a list of materials. The mental math runs: a 20ft container, plus a couple of windows, a wall-mounted heat pump, insulation, and drywall with paint and trim. The buyer adds those material lines together, lands on a number for a finished office, and walks in confident the budget covers the work.

The number that almost never gets written down is prep labour. Cutting openings in corten steel is a torch-and-grinder job that takes a competent welder 4 to 6 hours per window opening and 6 to 8 hours per door, including the steel sub-frame and the corner reinforcement. Framing interior walls against corrugated steel is a furring-strip and adhesive job with steel-to-wood transitions that take twice as long as wood-frame construction. Running electrical against a steel wall means surface-mount EMT or interior chase walls, rather than the easy in-stud drill-and-pull of residential work. Each task runs 30 to 60 percent slower than the wood-frame equivalent, and the welder or trim carpenter does not lower their rate because the substrate is harder.
The split on a finished interior conversion is roughly 40 to 50 percent labour, 35 to 45 percent materials, 10 to 15 percent permits and inspections, and the balance in delivery, site prep, and crane work. The buyer who priced the project on materials alone has, in practice, planned only part of a finished job. The overshoot is the missing labour. Owner-led DIY build surveys put under-budgeting at 50 to 80 percent and trace it to cascading cost drivers that multiply through the project rather than a single missed line item.
Trap 2: Why Do Cheap Windows and Doors Fail by Year Two?
Cheap residential windows and doors are the second container customization cost trap, and they show up at the big-box store. The owner buys sliders and entry doors because the budget is tight and the residential product looks identical to the commercial version in the picture. The install goes in clean, the container is occupied by month four, and by month fourteen the seals are leaking, the door is binding because the steel sub-frame flexed on the new bearing surface, and the slider track is corroding because the residential aluminum was never specified for the salt-and-corten environment.
Two failure modes drive almost every year-two complaint. The first is gasket compression set. Residential vinyl windows use foam-cell weather seal rated for the small thermal cycles of a wood-frame house, where the wall does not move more than a millimetre across the seasons. A container wall moves 3 to 5 millimetres at each window opening between minus 25 winter and plus 35 summer because the steel expansion coefficient runs roughly 12 micrometres per metre per Celsius. The residential gasket cannot keep up; by year two it is permanently compressed at the bottom of the frame and condensation runs onto the interior trim.
The second failure is hinge or track corrosion. The residential entry door comes with zinc-plated steel hinges for indoor garage use, rather than stainless or bronze for marine-grade exterior service. The slider track is mill-finish aluminum, rather than anodized or powder-coated. Both develop visible rust streaks within 12 to 18 months of a southern Ontario freeze-thaw cycle, and the door starts dragging on the strike plate as the hinge geometry shifts.
The spec for container windows and doors in Canada is commercial-grade fiberglass or aluminum-clad frames with EPDM gaskets, stainless or bronze hinges, marine-grade seal kits at every penetration, and a thermally broken frame on anything that sees winter occupancy. The price premium over the big-box residential product is 60 to 90 percent. The service life premium is roughly 5x. Spend once on a window that lasts 15 years rather than on a cheaper unit that needs replacement at year three and drags interior rework along with it each time.
| Factor | Big-box residential | Commercial-grade for containers |
|---|---|---|
| Frame material | Vinyl or mill-finish aluminum | Fiberglass or aluminum-clad, thermally broken |
| Gasket | Foam-cell, sets within 12 to 18 months | EPDM, rated for steel-wall movement |
| Hinges and track | Zinc-plated, rusts in a freeze-thaw cycle | Stainless or bronze, marine-grade seal kits |
| Typical service life | Roughly 3 years before rework | Roughly 15 years |
| Best use | Indoor residential walls that barely move | Corten steel walls in Canadian winters |
Trap 3: Do You Really Need a Vapour Barrier in a Container Build?
Skipping vapour barrier and condensation control is the third container customization cost trap, and it is the most expensive when it triggers, because it forces a teardown of finished interior work. The owner reads conflicting forum threads on vapour barrier, takes the cheaper interpretation, installs batt insulation with no vapour barrier, hangs drywall, paints the interior, and moves in.
Then winter hits. The interior is at 21 Celsius and 45 percent relative humidity, the corten steel wall behind the insulation is at minus 5 to minus 15 Celsius, and moisture migrates through the porous batt, reaches the cold steel, and condenses. By March there is water staining at the bottom of every interior wall, mould at the drywall-to-floor transition, and a permanent damp smell. The fix is full teardown of the affected sections, removal and disposal of the contaminated batt, installation of closed-cell spray foam or a sealed polyethylene vapour barrier on the warm side of new mineral wool, and reinstall of drywall, paint, and trim. The teardown-and-rebuild on a 20ft container lands on top of the original interior cost, so the owner has now paid twice for the same wall.
The spec is not optional. For year-round occupancy in Canada, the interior side of the steel needs either two inches minimum of closed-cell spray foam (acting as its own vapour retarder), or a polyethylene vapour barrier on the warm side of any porous insulation, lapped and sealed at every seam with acoustic sealant. Every serious hidden-cost guide treats vapour control as non-negotiable. The cost of doing it right at install is 10 to 15 percent above the bare insulation cost; the cost of doing it wrong is a five-figure rebuild.
Trap 4: Can You Do Your Own Container Electrical Without an ESA Inspection?
DIY electrical without an Electrical Safety Authority inspection is the fourth container customization cost trap, a paperwork trap that turns into a real-money trap when the owner tries to insure or sell. Electrical work in Ontario containers is regulated by the Electrical Safety Authority. Any installation wired to a panel or to grid power requires a notification of work filed with the ESA, work to ESA bulletin standards (licensed electrician or supervised), and a final inspection before energization. The notification and inspection are a modest, predictable line on a small container conversion, and they are filed at the planning stage rather than after the walls close up.
The owner who wires their own conversion without filing, runs romex through the corrugation, and energizes from a 50-amp generator or a house sub-panel has saved the inspection fee. The cost shows up in three places. First, the home insurance policy will not cover the container if there is uninspected electrical work, and the claim on any fire originating from that wiring will be denied. Second, when the property sells, the lawyer’s due diligence flags the missing ESA paperwork and the buyer either walks or demands a holdback. Third, if any local inspector or fire marshal sees the conversion, a disconnect order can be issued and the conversion sits unusable until a retroactive inspection is completed, which often means tearing open finished walls to expose the wiring.
The Ontario Construction News 2026 guide and the CADCR Canadian Design and Construction Report both flag ESA inspection as the most commonly skipped paperwork on owner-led conversions, and both note retroactive inspection runs two to three times the cost of the original because the inspector now has to see covered-up wiring. File the notification at planning, run to ESA bulletin standards, pay the fee, keep the certificate. The premium over DIY-and-hope is small at install and trivial against the insurance, resale, and disconnect risk it removes.
Trap 5: What Happens When You Skip Container Site Prep?
Ignored site prep is the fifth container customization cost trap, the one that costs the least to avoid and the most to fix after the fact. The owner orders a 20ft or 40ft container, the truck delivers it to a level-looking patch of yard, and the container goes down on bare earth or on a couple of railway ties. By month six the container has settled differentially, the door end is two inches lower than the back, the cargo doors no longer swing freely, the roof pools water at the low corner, and the interior walls show diagonal cracking at the corner welds.
The site-prep spec is four solid bearing points at the corner castings: four concrete pier blocks, four 12x12x6 concrete pads, or a continuous gravel pad compacted to 95 percent standard Proctor with the diagonals levelled within 12 millimetres. For a 20ft box, the four pier or pad approach takes modest materials and about a half day of labour. A 40ft box needs the same bearing points spread over the longer span, and soft ground pushes it onto engineered fill. The crane and delivery driver will not level the box; they place it where the prep dictates.
Lifting a settled container with a crane, regrading the pad, and resetting the box costs several times the at-install figure, plus any interior repair caused by the differential settlement. Ontario planning briefs put site prep at 15 to 25 percent of total project cost when done at install and at two to three times that figure when retrofitted. Site prep also depends on soil: clay-heavy southern Ontario soils heave 25 to 75 millimetres seasonally between freeze-thaw cycles, so the pad has to extend below frost depth or the container moves with the heave. A 20-minute conversation with a local excavator before the container arrives is the cheapest insurance on the project.
Trap 6: How Does “While I Am At It” Scope Creep Blow the Budget?
Scope creep is the sixth container customization cost trap, and it does the most damage because it never feels like a trap while it is happening. The container arrives, the conversion is underway, the walls are framed. The owner walks the site with the contractor and says: “while we are at it, can we add a second window on the east wall, upgrade the door to a French double, run a water line for a coffee bar, and add a small loft for storage?” Each item sounds small. Each carries its own permit implication, labour-time hit, material spec, and ripple-effect cost on the systems already framed.
The pattern: the original office picks up four “while I am at it” features over the build and finishes well above the starting budget. The second window adds the unit plus the cutout plus reinforcement steel plus trim. The French door upgrade adds the unit plus the wider cutout plus the modified header. The water line adds the rough-in plus the freeze-protected supply plus the shutoff. The loft adds the platform plus the ladder plus the railing. None are bad on their own; the problem is they were not in the budget and were approved moment-by-moment without being totalled.
The discipline is a written change-order log signed by the owner before any unbudgeted item starts: description, total cost including labour and materials, running project total. The mental friction of writing the line filters out roughly two thirds of the scope creep before it lands in the build. The Monograph budget-overrun analysis and the Mastt cost-overrun report both identify uncontrolled change orders as the single largest driver of project cost growth across all building types.
Trap 7: Why Does the Cheapest Contractor End Up Costing the Most?
Hiring the cheapest contractor is the seventh container customization cost trap, and it closes the loop. The owner gets three quotes and picks the lowest because the spreadsheet looks reasonable. Six months later the work is done, but the windows leak, the electrical did not pass ESA, the vapour barrier is missing, and the trim is loose. The owner pays a second contractor to fix the first contractor’s work and the project finishes at more than the highest original quote.
Cheap contractors are rarely dishonest; the cheap quote is almost always cheap because something is missing from the scope, the labour rate is below market because the crew is inexperienced, or materials are sourced from the cheapest residential product available. The owner who picks on price buys a quote rather than a finished project. Our 30 years in the trade produce one rule: the contractor who walks the site for an hour, asks about soil, points to specific gaskets and brand names, and quotes 15 to 25 percent above the cheap quote almost always finishes inside the original budget. The contractor who quotes in 30 minutes off a verbal description and lands 30 percent below the others almost always triggers rework.
Five screening questions before you sign with any contractor: two references from container conversions specifically rather than residential renovations; which welder they use for steel cutouts and whether the welder is on their crew or sub-contracted; the ESA certification number of the electrician they will use; which insulation and vapour-control system they spec and why; and their written change-order policy. A contractor who answers all five in plain language is almost certainly the right hire.
How Do You Build a Realistic Container Conversion Budget?
A realistic container conversion budget is the framework we walk every buyer through at the yard, and it is built on three numbers. The first number is the bare box, which is where picking the right grade in the yard sets your starting point. A new one-trip 20ft sits at the top of the range in 2026, a cargo-worthy 20ft sits below it, and a 40ft high cube carries a premium over the 20ft across both grades. Pick the box at the yard, do not pay for it sight unseen. The second number is the all-in conversion target, which runs at 4 to 7 times the bare container cost for a finished office or workshop and at 8 to 12 times for a habitable secondary suite. That multiplier is how a plain box becomes a finished office or a livable suite. The third number is the contingency, which is 15 to 20 percent on top of the all-in target for any owner-led build and 10 to 15 percent for any contractor-led build with a signed fixed-price quote.
Putting those three together: a buyer planning to turn a container into an office should walk in budgeting four to seven times the bare box plus a 15 to 20 percent contingency. A buyer planning a habitable suite should plan for eight to twelve times the box plus the same contingency. Anything tighter than that is a project that is going to stall or trigger one of the seven traps in this guide. We have watched dozens of buyers underfund and we have watched dozens fund correctly. The funded projects finish on time and the underfunded ones do not.
To see where each line of the budget actually lands, our feature-by-feature breakdown of what drives a conversion quote walks through every modification by category. For the broader scope of which conversions are realistic in Ontario, read what we cover on scoping a container build that fits your site. On the buying side, our field notes on choosing the right grade and dodging marketplace scams cover condition inspection and the deposit fraud that hits Canadian buyers hardest.
Where Does Van Blanc Fit in a Cost-Controlled Conversion?
Van Blanc is the container supplier in a cost-controlled conversion. We do not run the conversion crew, we do not subcontract HVAC or electrical, and we do not mark up trades work. What we do is sell the right container at the right grade with the right paperwork, deliver from our 4 Brantford yards in 1 to 3 days across Ontario, and walk every buyer through the realistic cost picture before they commit. We have customers who walked the yard in 2007 and customers who walked the yard last week. The 200+ containers in stock are visible and walkable before any money changes hands, which alone solves the largest single buyer trap in the Canadian market: the Facebook Marketplace deposit scam where a stranger demands e-transfer for a container that never existed.

The seven-trap pattern in this guide does not depend on which yard you buy the box from. It depends on planning, paperwork, and discipline through the conversion process. Where we add value is at the front end, when the buyer is still picking the box, sizing the budget, and deciding which grade fits the use case. A 20-minute conversation at the yard with Paul or Christian will surface most of the traps before the buyer signs a single contractor agreement. Walk the row, pick the box, and ask the questions. Call 519-754-6844 or visit the yard at our Brantford location.
Frequently Asked Questions: Container Customization Cost Traps in Canada
How much does container customization actually cost in Canada in 2026?
For a finished office or workshop conversion, the realistic all-in budget runs 4 to 7 times the bare container cost. A container becomes a finished office once you add steel cutouts, framing, insulation, vapour barrier, electrical, HVAC, finishes, and site prep. For a habitable secondary suite, the multiplier rises to 8 to 12 times the container cost because permits, water and sewer rough-in, and CSA-compliant finishes drive the spec up. Add 15 to 20 percent contingency on top for any owner-led build. The most common reason projects overshoot is one or more of the seven traps rather than bad luck in this guide.
What is the single biggest cost trap in container customization?
Underestimating prep labour is the largest single trap by dollar value. Most owner-led budgets capture materials but leave labour blank or thin. The realistic labour split on a finished interior conversion is 40 to 50 percent of total project cost, because cutting corten steel, framing against corrugated walls, and routing electrical against steel each run 30 to 60 percent slower than the equivalent wood-frame work. A materials-only budget routinely grows by roughly two thirds once labour is priced properly into the finished job.
Why do residential windows and doors fail in shipping container conversions?
Residential vinyl windows use gasket material rated for the small thermal cycles of a wood-frame wall. A corten steel container wall moves 3 to 5 millimetres at each window opening between minus 25 winter and plus 35 summer because steel has a higher thermal expansion coefficient than wood framing. The residential gasket cannot keep up and develops compression set within 12 to 18 months, leaking air and condensation onto interior trim. Commercial-grade fiberglass or aluminum-clad frames with EPDM gaskets and stainless hinges cost roughly 60 to 90 percent more and last roughly 5x longer.
Do I really need vapour barrier in a container conversion in Canada?
Yes, without exception, for any year-round occupancy. Without a sealed vapour barrier or a closed-cell spray foam acting as its own vapour retarder, interior moisture migrates through porous insulation, condenses on the cold corten steel, and produces water staining, mould growth, and damp odours within the first winter. The fix is a full teardown of the affected wall sections and a rebuild, which lands on top of the original interior cost so you effectively pay for that wall twice. The cost of doing vapour control right at install is roughly 10 to 15 percent above the bare insulation cost.
Can I do my own electrical in a shipping container in Ontario without an ESA inspection?
You can wire it physically but you cannot legally energize and insure it. Any electrical installation in an Ontario container connected to a panel or to grid power requires a notification of work filed with the Electrical Safety Authority, work to ESA bulletin standards, and a final inspection before energization. Skipping the notification voids the home insurance coverage on the structure, blocks resale at the lawyer due-diligence stage, and triggers a teardown for retroactive inspection if any local authority sees the conversion. The notification and inspection fee is modest at install and runs two to three times higher when done retroactively because the inspector has to see wiring that is already covered up.
How important is site prep for a 20ft or 40ft container conversion?
Site prep is the cheapest trap to avoid and one of the most expensive to fix. The container needs four solid bearing points at the corner castings, either four concrete pier blocks, four 12x12x6 concrete pads, or a continuous gravel pad compacted to 95 percent standard Proctor with the diagonals levelled within 12 millimetres. Done at install, that is modest materials and labour. Done after the fact, lifting a settled container with a crane and resetting it after differential settlement costs several times as much, plus any interior repair caused by binding doors, cracked drywall, or pooling water on the roof.
How do I stop scope creep from blowing my container conversion budget?
The discipline is a written change-order log signed by the owner before any unbudgeted item starts. A two-line entry per change describing the work, total cost including labour and materials, and running project total to date. The mental friction of writing and signing the line filters out roughly two thirds of the “while I am at it” additions before they land in the build. Each individual change feels small but the aggregate effect typically adds 30 to 40 percent to an uncontrolled project. Scope creep is the single largest driver of container conversion budget overruns across the industry.
How do I screen container conversion contractors to avoid rework?
Ask five questions before signing with any contractor. First, two references from container conversions specifically rather than residential renovations. Second, which welder they use for steel cutouts and whether the welder is on their crew or sub-contracted. Third, the ESA certification number of the electrician they will use. Fourth, which insulation and vapour-control system they spec and why. Fifth, their written change-order policy. A contractor who answers all five in plain language is almost certainly the right hire. A contractor who hedges on any is almost certainly the source of rework.
What is a realistic contingency budget on a container conversion?
For owner-led builds, plan 15 to 20 percent contingency on top of the all-in conversion target. For contractor-led builds with a signed fixed-price quote, plan 10 to 15 percent. The contingency is the realistic cost of the small discoveries that show up across every conversion project. Soil that is wetter than expected adds drainage. Steel that is more corroded than the inspection caught adds repair welding. Permit conditions that change mid-project add documentation. A conversion target only carries a realistic total cost once the 10 to 20 percent contingency is added on top and lands inside the budget rather than ambushing it later.
Does Van Blanc help me cost out a container customization project?
Yes, that conversation is part of every container sale where the buyer is converting to office, workshop, or living space. We do not run the conversion crew or mark up trades work. What we do is supply the right container at the right grade with the right paperwork, point to the realistic cost picture across all seven traps, and point you toward conversion contractors and trades in your area when asked. Walk the row at one of our 4 Brantford yards, see 200+ containers in stock, and pick the specific box before you pay. Call 519-754-6844 or visit the yard to book the conversation in person.
Sources
- Builder Expert UK, 2026 container home pricing software and budget overruns
- Ontario Construction News, 2026 Canadian container pricing for construction professionals
- Canadian Design and Construction Report, CSA and ESA compliance on Canadian container conversions
- Monograph, Budget overrun early signs, core causes, and fast fixes
- Mastt, Causes of cost overruns in construction project management
Related Reading
- The parent overview of what a container conversion involves
- Costing a conversion one feature at a time
- Buying a container in Canada: grade selection and scam patterns
- Heating and cooling decisions for an Ontario container
- How we approach insulating a container for our winters
- Spotting fake container sellers before you send a deposit
- The custom build-outs available from our Brantford yard
Ready to price your container?
Tell us the size and your postal code and we’ll send back an all-in number, container, delivery, and placement, usually within 1-3 days. No pressure, no mystery fees.
Family-run in Brantford since 1995 · 200+ containers in stock · 4.9★ across 140+ Google reviews · every box graded by a person, walk it before it lands.
Sources & References
Authoritative external sources cited or referenced in this guide: