
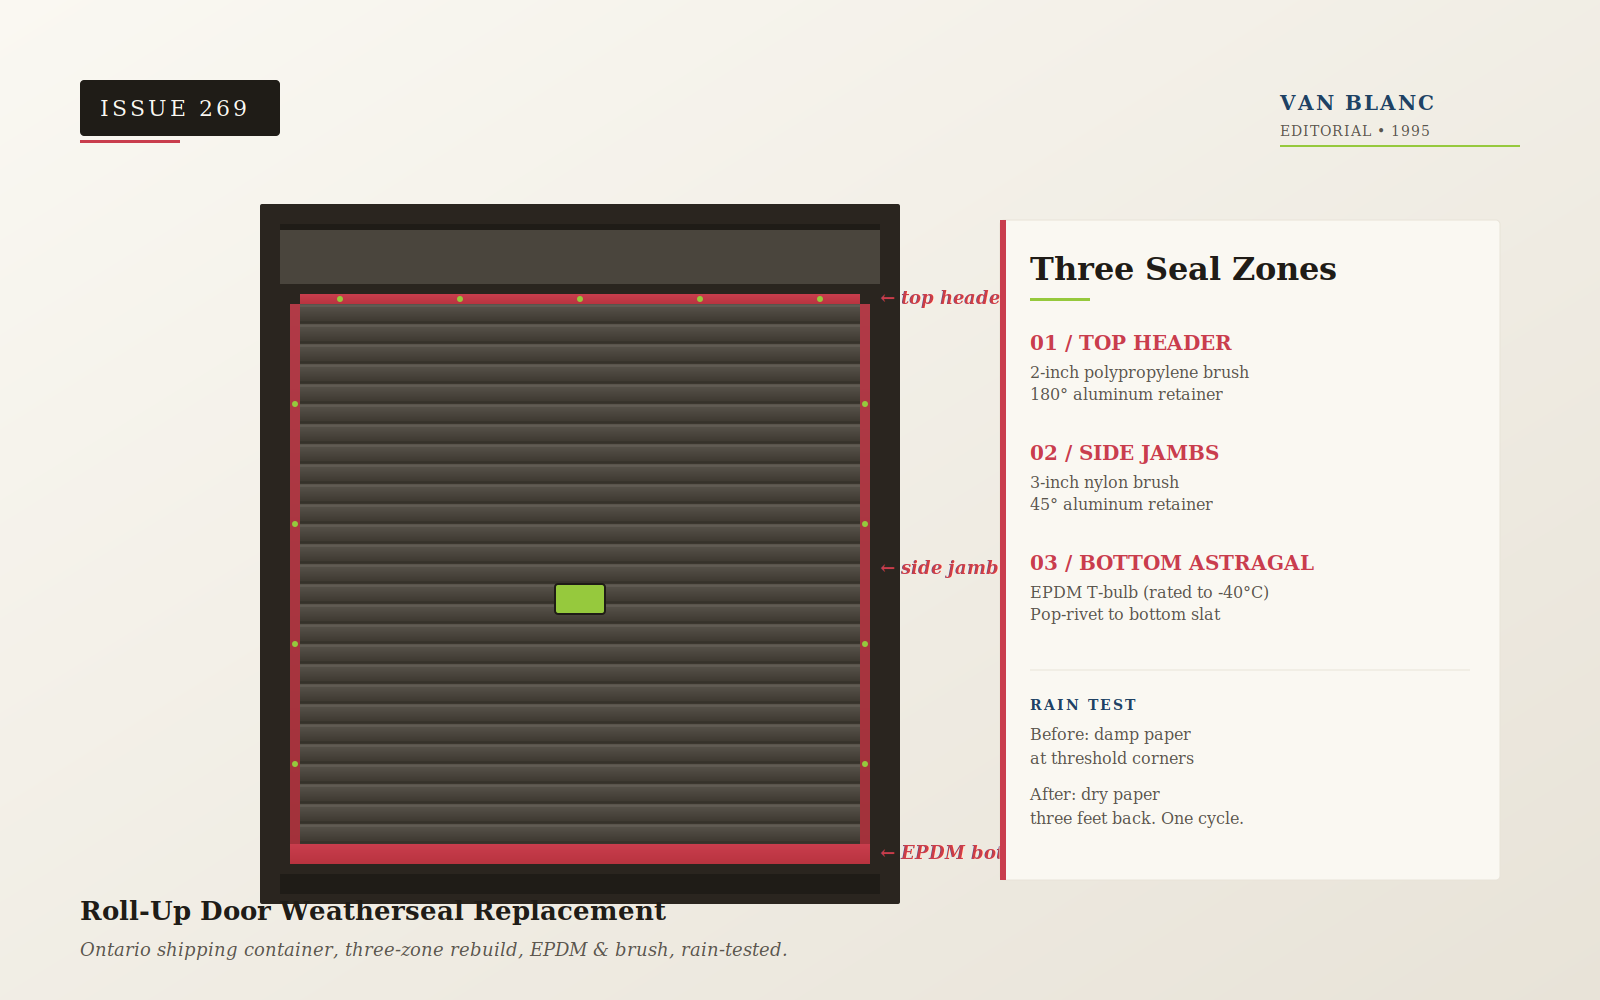
Quick Answer: Roll-up door weatherseal replacement on a shipping container in Ontario is driven mostly by the seal material you spec and runs about a half day of labour. A full rebuild covers three zones: a top 2-inch brush retainer, side 3-inch brush jambs, and an EPDM bottom astragal, all set with pop-rivets. Done right, the door dry-tests in a single rain cycle. Reach Paul or Christian for a delivered quote. Three decades family-run, 140+ verified Google reviews. 1-3 day delivery from our 4 Brantford yards across Ontario.
In This Guide
- Why Do Roll-Up Door Seals Fail in Ontario?
- What Are the Three Seal Zones on a Container Roll-Up Door?
- How Do You Diagnose a Roll-Up Door Leak Before Buying Parts?
- EPDM vs PVC vs Brush: Which Seal Goes Where?
- What Tools and Hardware Do You Need to Reseal a Container Door?
- How Do You Replace the Bottom Astragal Step by Step?
- How Do You Install Side Jamb Brush Seals?
- How Do You Replace the Top Header Brush and Hood Drip?
- How Do You Rain-Test a Roll-Up Door After Resealing?
- Where Do You Source Roll-Up Door Seals in Ontario?
- What Are the Most Common Weatherseal Mistakes?
- Frequently Asked Questions
Reading time: about 14 minutes.
A weatherseal failure on a container roll-up door rarely shouts. It whispers across three winters: a damp smell in March, a rust ring around a forklift battery in May, then one summer afternoon you open the bin and the OSB you stored against the back wall has a black halo. By then the bottom astragal is shot, the jamb brushes are flattened, and the hood drip is leaking behind the spring barrel. The fix is straightforward if you understand the three seal zones and respect the order of operations. This guide walks the full roll-up door weatherseal replacement for an Ontario shipping container from diagnosis through rain test, written from what we see on our Brantford yard floor every week.
Why Do Roll-Up Door Seals Fail in Ontario?
Roll-up door seals fail in Ontario mainly because of freeze-thaw cycling. From January through March the bottom astragal drops below -20 Celsius and rises above zero dozens of times. Cold-rated EPDM rubber survives that swing; the cheap PVC strip on many low-cost door kits glazes, splits, and breaks off. Side and top brushes then flatten and shed with age.
Ontario punishes weatherseals in a way coastal climates do not. From January through March the bottom astragal cycles below -20°C and back above zero forty or fifty times. EPDM rubber stays flexible across that swing if it was sourced for sub-zero service. The cheap PVC strip that comes pre-installed on many low-cost roll-up door kits does not. It glazes, splits along the leading edge, then breaks off in chunks under the door curtain the first time the operator yanks it open on a frosty morning.
The side jamb brushes have a different failure mode. They get compressed flat against the corrugation by years of door operation, and the bristles lose their spring. Once compressed below about half their original height, they no longer track the inside corrugation profile and wind-driven rain finds the channel. The top header brush usually fails last because it sees less mechanical wear, but it does see UV. After about six summers the polypropylene tips become brittle and shed.
Container roll-up doors live a tougher life than a residential overhead door. The roll-up sits in a corrugated steel pocket that flexes when the container is jacked, tilted, or trucked. Most aftermarket seals were engineered for self-storage applications where the door frame is plumb, square, and stationary. Bolt those same seals to a forty-foot high cube that just came off a tilt-deck and the gaps will not be where the seal expects them.
Paul LeBlanc, owner: “People blame the seal, but in Ontario it is almost always the climate finding the weak material. I have watched PVC astragals come off a one-winter-old door in pieces. Spec the rubber rated for cold and you stop having this conversation every spring. We have been pulling seal sets across our Brantford yards for the better part of three decades, and the pattern never changes.”
What the Industry Standard Says
ISO 1496-1 specifies the structural tests for series 1 dry-cargo containers, including the weatherproof seal requirements at door and panel interfaces. The standard does not prescribe seal material, only that the assembled container shall remain wind and watertight after the prescribed test sequence. That gap is why seal quality varies so widely on the aftermarket. A Wind and Watertight (WWT) grading from the Institute of International Container Lessors (IICL) verifies the door seals at the point of inspection; it does not guarantee them three winters later.
What Are the Three Seal Zones on a Container Roll-Up Door?
A container roll-up door has three independent seal zones: the top header brush, the two side jamb brushes, and the bottom astragal. Every roll-up door on a container has these three zones, and you should treat them as three separate jobs even if you tackle them in one afternoon.
Top header. A 2-inch brush retained in a 180-degree aluminum extrusion, bolted or pop-riveted to the underside of the header above where the curtain rolls into the spring barrel. Its job is to seal the gap between the curtain face and the steel header when the door is closed, and to keep windblown rain from cresting the hood and finding the inside.
Side jambs. Two 3-inch brushes retained in 45-degree aluminum, one each side, running floor to header. They ride against the inside face of the door curtain corrugation. The 45-degree angle lets the bristles fan slightly into each corrugation valley, so a properly installed jamb brush rides the curtain profile rather than just kissing the high points.
Bottom astragal. A T-bulb or P-bulb EPDM rubber strip bolted to the inside face of the bottom slat or to a metal retainer welded across the threshold. The astragal compresses against the floor or the threshold plate when the door closes. This is the seal that takes the worst beating: every door cycle drags it across grit, salt, sand, and on bad days, ice. It is also the seal where 80% of roll-up door leaks originate.
Diagnose Before You Order
Before you call us or any supplier for replacement seals, close the door at noon on a sunny day and stand inside the container. Look at the bottom edge of the curtain from the inside. Daylight you can see through the bottom seal almost always means a torn astragal. Daylight at the corners means a compressed side brush. Daylight across the top means a failed header brush or a missing hood drip. Knowing which zone before you order saves a re-trip to the supply house.
How Do You Diagnose a Roll-Up Door Leak Before Buying Parts?
To diagnose a roll-up door leak, close the door, lay craft paper across the threshold, and trace where water actually enters before you order any seal. A surprising number of roll-up door leaks are not seal leaks at all. They are curtain leaks (a punched corrugation), hood leaks (a missing or distorted hood drip), or threshold leaks (a low spot in the chassis where the container is sitting on uneven ground). Replacing a seal that was not the source of the water gets you back inside the container three weeks later wondering why the new EPDM is already wet.
The diagnostic sequence we walk every customer through on the Brantford yard:
- Dry the inside floor and lay sheets of brown craft paper across the threshold and back about three feet from the door.
- Wait for the next steady rain or, if you cannot wait, run a garden hose with a fan nozzle across the closed door for fifteen minutes from outside. Start at the bottom and work up.
- Read the paper. Wet at the threshold corners means side jamb failure. Wet straight across the threshold means bottom astragal failure. Wet two feet back from the threshold but dry at the threshold itself means the curtain is the leak, not the seal. Wet against the side walls means a chassis racking issue that no amount of new seal will fix.
Paul has been ordering and installing seal sets out of our Brantford yards for nearly three decades. About a third of the “leaking roll-up door” calls we take turn out to be curtain or chassis issues. Our complete walk-through of container roll-up doors starts with this same diagnostic, because fitting a new seal to a punched curtain wastes the customer’s money and ours. Get the diagnosis right first.
EPDM vs PVC vs Brush: Which Seal Goes Where?
For an Ontario container, the right pairing is an EPDM bottom astragal with nylon or polypropylene brushes on the sides and top; PVC belongs only on bottom astragals in warm climates. The aftermarket sells three seal families for container roll-up doors and they are not interchangeable. Each has a zone where it earns its keep.
| Material | Best zone | Cold-rated | Service life | Failure mode |
|---|---|---|---|---|
| EPDM rubber | Bottom astragal | Yes (to -40°C) | 8-12 yrs | Tears at fasteners |
| PVC blade | Bottom astragal (warm climates only) | No (glazes below -10°C) | 3-5 yrs in Ontario | Splits along leading edge |
| Polypropylene brush | Side jambs, top header | Yes | 6-10 yrs | UV embrittlement, compression set |
| Nylon brush | Side jambs, top header (heavy use) | Yes | 10-15 yrs | Compression set |
| Silicone bulb | Specialty cold-storage retrofits | Yes (to -55°C) | 15+ yrs | UV chalking, premium cost |
For an Ontario container that lives outside year round, the right pairing is EPDM bottom astragal plus nylon-bristle side and top brushes. The cost premium over PVC and polypropylene runs roughly 30%, but you buy back two to four years of service life and you do not bookmark this article for another seal replacement in 2030. If the container is conditioned space (reefer, office conversion, a what to know about refrigerated containers retrofit), silicone bulb on the bottom and nylon brush on the sides is the cold-storage standard.
Brantford and the Freeze-Thaw Tax
Our Brantford yards sit in a freeze-thaw belt that runs roughly Lake Erie shore north to the 401 corridor. We see forty to sixty thaw events per winter on a typical container left in the yard, which is roughly double what a Sudbury or North Bay container experiences (those bins stay frozen straight through January and February, which is mechanically gentler on seals). Customers in this belt should always spec EPDM bottom astragal, not PVC, regardless of what came on the original door kit.
What Tools and Hardware Do You Need to Reseal a Container Door?
Resealing a container roll-up door needs only common hand tools: a 3/16-inch rivet gun and pop-rivets, a drill, a hacksaw or aviation snips, a tape measure, and silicone-based seal lubricant. A full three-zone replacement on a 7-foot or 8-foot wide container roll-up door takes one person about three hours, two people about ninety minutes. Tools needed:
- 3/16-inch rivet gun and a box of 3/16 x 1/2-inch aluminum pop-rivets (count: about 40)
- Drill with 3/16-inch bit and a center punch
- Hacksaw or aviation snips for cutting aluminum retainer
- Tape measure, marker, square
- Phillips driver and 1/4-inch self-tapping screws as a backup fastener
- Silicone-based seal lubricant (do not use petroleum-based, it attacks EPDM)
- Wire brush, mineral spirits, clean rags for prepping the retainer surface
- Stepladder if working on a high cube
Hardware list for one full replacement on a standard 7-foot wide roll-up:
- One bottom astragal EPDM strip, T-bulb profile, 7 feet long
- One bottom astragal aluminum retainer strip, 7 feet long
- Two side jamb brush kits, 3-inch bristle in 45-degree retainer, each cut to the door height (typically 7’10” for an 8’6″ container, 8’10” for a high cube)
- One top header brush kit, 2-inch bristle in 180-degree retainer, 7 feet long
- Optional: one hood drip strip if the original is bent, corroded, or missing
Site prep is straightforward. Park the container on level ground or as close as you can get. Sweep the threshold and the inside floor near the door clean of debris. Wire-brush the steel surfaces where the new retainers will land. If the old retainer was riveted on, drill the rivet heads off and drift the shanks out from behind. Wipe the steel with mineral spirits and let it flash off completely before you start setting new fasteners.
How Do You Replace the Bottom Astragal Step by Step?
Replacing the bottom astragal means removing the old strip, cleaning the slat, sliding fresh EPDM into a cut-to-length retainer, and pop-riveting it back so the bulb compresses evenly against the threshold. The bottom astragal is the high-leverage seal. Get it right and you will have eliminated 70-80% of your water entry. The job in nine steps:
- Open the door fully and chock the curtain so it cannot accidentally roll down. A 2×4 wedged into the side track at about chest height holds the curtain reliably.
- Remove the old astragal. If it is rubber bonded directly to the bottom slat, peel it. If it sits in a retainer, drill or unscrew the fasteners. Save one piece of the old astragal as a profile reference.
- Clean the mounting surface. Wire-brush, mineral spirits, dry. Any old adhesive or rust scale under the new retainer will telegraph through and create a leak path.
- Measure twice. The new astragal should run the full inside width of the door opening minus 1/8 inch each side for clearance. On a standard 7-foot door that is 83 3/4 inches. Mark the cut on the EPDM with a fresh blade in a utility knife.
- Trim the retainer to match. Cut the aluminum retainer to the same length with a hacksaw. Deburr the cut edges with a file so you do not nick the EPDM during install.
- Slide the EPDM into the retainer before you mount the retainer to the door. The bulb side faces down toward the threshold. The flange side captures into the retainer channel. Lubricate the flange with silicone-based seal lubricant if the channel is tight.
- Position the assembled retainer against the bottom slat with the bulb projecting 3/4 inch below the slat edge. Mark the rivet hole locations through the pre-punched retainer onto the steel slat.
- Drill the rivet holes through the slat with a 3/16 bit. Set the assembled retainer in place and pop-rivet at every hole. Start at the center and work outward to avoid pulling the retainer crooked.
- Close the door slowly and watch the bulb compress against the threshold. It should compress about 1/4 inch evenly across the width. If it bottoms hard on one side, the floor is uneven and you may need a threshold plate to even the contact.
The whole job runs about 45 minutes once you have done it twice. The first one always takes an hour and a half because every step is new.
How Do You Install Side Jamb Brush Seals?
To install side jamb brush seals, cut each 45-degree retainer to door height, orient the angled face so the bristles fan into the curtain corrugation sweeping inward, then rivet at 8 to 10-inch intervals. Side jambs are the second-most-important zone because they handle the wind-driven rain that hits the door at an angle. Brush installs are forgiving, but two details matter:

The 45-degree angle. The retainer is bent at 45 degrees on purpose. The flat face of the 45 sits against the jamb steel; the angled face presents the bristles into the curtain corrugation. Mount it backwards and the bristles cannot fan into the corrugation valleys.
Bristle direction. The brush should sweep toward the inside of the container, not toward the outside. When the door closes, the curtain pushes the bristles slightly inward. If you install them sweeping outward, the first close cycle bends every bristle the wrong direction and you have effectively zero seal at the corners.
Install sequence:
- Measure the door opening height. On a standard 8’6″ container with a 7’10” rough opening, your jamb brush runs the full 7’10”.
- Cut both jamb retainers to length. Match-cut them so they end at the same elevation top and bottom.
- Hold each retainer in position against the jamb. The bristle face should kiss the curtain when the door is closed but not bend hard against it. Mark fastener locations.
- Pre-drill, then rivet or self-tap-screw at 8 to 10-inch intervals up the length of each retainer.
- Close the door and check from outside in low light. You should see no daylight at the jamb-to-curtain interface.
Paul LeBlanc, owner: “The mistake we see most often on do-it-yourself jamb installs is people screwing the retainer flat to the steel instead of letting the 45-degree angle do its work. The brush is engineered to fan into the corrugation. Put it on backwards or flat against the wall and you are leaving a quarter inch of unsealed gap at every valley in the curtain. Customers come back asking why the door still leaks after they installed new brushes. Nine times out of ten it is orientation, not product.”
How Do You Replace the Top Header Brush and Hood Drip?
The top header brush is the simplest zone to replace: cut a 2-inch brush in its 180-degree flat retainer to width and pop-rivet it under the header. While you are up there, check the hood drip, because a bent or corroded drip edge sends rain straight past a brand-new brush. The top header brush sits in a 180-degree retainer (flat aluminum, no bend) and bolts to the underside of the header above where the curtain enters the spring barrel housing. Its job is to seal the gap between the curtain face and the steel header when the door is fully closed.
The header brush is the easiest zone to install because the geometry is forgiving. Cut to width, position with the bristles projecting 1/2 inch below the header steel, pop-rivet through the pre-punched holes, done. Twenty minutes including measuring.
While you are working on the top, check the hood drip. The hood is the curved steel cover over the spring barrel on the outside of the container. It has a drip edge welded along its bottom that channels rain off to the side and away from the door opening. If the drip edge is bent flat against the hood (forklift damage is the usual cause) or corroded through, rain runs straight down the hood face into the top header brush instead of dripping clear. New header brushes will not save you if the hood drip is failed. Fix it first.
How Do You Rain-Test a Roll-Up Door After Resealing?
To rain-test a roll-up door, lay craft paper across the threshold and either wait for two hours of steady rain or run a fan-nozzle hose across the closed door from outside, then read where the paper gets wet. Every replacement job should end with a rain test. There are two acceptable versions:
Natural rain. After installation, lay craft paper across the threshold and three feet back from the door. Wait for the next steady rain of two hours or more. Read the paper afterward. Dry paper means you sealed the door. Damp paper means you missed something.
Hose test. Run a garden hose with a fan nozzle across the closed door from outside for fifteen minutes, starting at the threshold and working up. Have a helper inside watching for any infiltration. Mark any wet spots with a piece of tape from the inside so you know where to address.
A well-rebuilt door tests dry the first time. If you get any infiltration after a full three-zone replacement, the leak is almost always one of three things: a missed corner at the bottom-jamb transition, a curtain puncture you did not catch in diagnosis, or a chassis racking issue putting the door out of square. Walk those three suspects in that order.
Where Do You Source Roll-Up Door Seals in Ontario?
You can source roll-up door seals in Ontario from at least four provincial distributors that stock the common SKUs, or walk into our Brantford yard and order EPDM and brush kits cut to length. The Ontario aftermarket for container roll-up door seal kits has thickened over the last five years. Five years ago you were ordering from U.S. parts suppliers and paying cross-border freight plus duty. Today the common SKUs are stocked by at least four Ontario distributors and most can ship next-day across the GTA, Hamilton, Niagara, and Waterloo regions.
For Brantford-area customers and anyone within reasonable drive distance, the easiest path is to walk our yard, look at the seal cross-sections on a couple of sample doors, and order through us. We bring in EPDM bottom astragal in 100-foot rolls and cut to length, and we stock the standard 7-foot and 8-foot brush kits for both jamb and header retainer profiles. For walk-in pickup at our 90 Morton Avenue East yard the same day is the rule, not the exception. Plenty of buyers pair a seal kit with a fresh bin, so if you are also weighing a container to buy outright, we quote the box and the seal parts together. Shipped orders reach anywhere in Ontario in 1-3 days from our 4 Brantford yards.
Many people call us saying they can get a seal kit far cheaper on Facebook Marketplace. Two weeks later they call back saying the seller never shipped and the e-transfer is gone. The suspiciously cheap bin-and-seal kit on Facebook is the one that never arrives. We have taken that panicked call-back too many times to count over our 30-year history. The price from an established Ontario supplier with a real Brantford yard you can walk through is the floor, not the ceiling.
What Are the Most Common Weatherseal Mistakes?
The most common weatherseal mistakes are using PVC astragal in a cold climate, mounting side brushes backwards, mis-cutting the astragal length, over-tightening rivets, and skipping the final rain test. Here are the recurring errors we see on customer-installed weatherseal kits, ranked by how often they bring the customer back for a second pass:
- PVC bottom astragal in an Ontario climate. Cheap kits ship with PVC because it lowers the SKU price. PVC glazes and splits below -10°C. Specify EPDM, period.
- Side brushes installed backwards. The 45-degree retainer has a correct orientation. Mount it flat and you have a wall of bristles that cannot fan into the curtain corrugation.
- Astragal cut too long. Forces the seal to bow in the middle, leaving a high spot that does not contact the threshold.
- Astragal cut too short. Leaves corner gaps at both ends where water enters at the side seam.
- Rivets pulled too tight. Crushes the retainer flange against the EPDM and pinches it. The pinch becomes a tear within six months.
- Old adhesive left on the mounting surface. The new retainer rocks on the residue and leaves a leak channel.
- No silicone lubricant. The first frost cycle gums the seal to the threshold and the operator yanks the door open, ripping the bulb off the retainer.
- Skipping the rain test. You only learn the job failed three months later when the OSB at the back wall shows mold.
Most of these are avoided by working slowly, by laying the parts out before you start cutting, and by reading the retainer profile carefully so you know which face goes against the steel.
A Working Service Schedule for Container Roll-Up Door Seals
Once you have rebuilt the seals, keep them alive with light maintenance:
- Every spring: Wipe the bottom astragal with a silicone-based protectant. Inspect for tears or compression set.
- Every fall: Sweep grit and debris off the threshold. Check the hood drip for corrosion.
- Every two years: Run a hose test. Mark any leak points and address before the freeze sets in.
- Every five years: Replace the bottom astragal proactively. EPDM has 8-12 year life but the bottom takes the worst beating.
- Every eight to ten years: Replace the full three-zone kit. Brushes lose their spring even if they look intact.
For commercial sites that cycle the door multiple times a day (a contractor yard, a busy storage compound, a working farm), halve these intervals.
Ready to price your container?
Tell us the size and your postal code and we’ll send back an all-in number, container, delivery, and placement, usually within 1-3 days. No pressure, no mystery fees.
Family-run in Brantford since 1995 · 200+ containers in stock · 4.9★ across 140+ Google reviews · every box graded by a person, walk it before it lands.
How Does Seal Condition Relate to Container Grade?
Seal condition tracks container grade: one-trip doors arrive with new seals, Cargo Worthy doors usually need a bottom astragal within two years, and Wind and Watertight doors often need a full three-zone rebuild in the first year. Container grades carry expectations about seal condition. If you are buying a used container with a roll-up door, know what to expect at each grade so you can plan the rebuild budget into your purchase.
One-trip containers arrive with new seals. The door is essentially new, the EPDM has not seen a winter, the brushes are at full bristle height. No rebuild expected for the first five to seven years if the container lives outside in Ontario, longer if it lives under cover.
Cargo Worthy (CW) containers have seals that pass a re-inspection for international shipping but have seen multiple ocean crossings. Expect to rebuild the bottom astragal within the first two years of ownership. Side brushes typically have another three to five years left. Buying a used roll-up door container means budgeting for an astragal swap as part of the first-year cost.
Wind & Watertight (WWT) containers are guaranteed weather-resistant at the time of inspection but the seals are at end-of-life or close to it. Plan a full three-zone rebuild within the first year. We start most WWT roll-up doors at full kit replacement, because piecemeal repair on a tired door is usually false economy. If a tired door has you thinking past seals, our yard handles full door swaps and conversions as part of the on-site container customization work we do before delivery.
As-Is containers may have seal failures that contributed to the As-Is grading in the first place. Inspect the seals before you buy, factor a full rebuild into the price, and walk away if the curtain itself shows punctures because no seal kit will save you.
Reach Van Blanc in Brantford
We have been supplying shipping containers across Ontario since 1995. Our warehouse is at 90 Morton Avenue E in Brantford, and we deliver right across the province with payment due on delivery. No surprise fees, no chase-the-paperwork.
Van Blanc Ent. Inc. 90 Morton Ave E Unit 1B, Brantford, ON N3R 7J7. +1 888-509-6658
If your roll-up door is leaking or your seals are tired, walk our yard and look at the rebuild parts before you buy. Paul or one of the team will pull the cross-sections, show you the EPDM versus PVC difference, and quote the full three-zone kit on the spot.
Frequently Asked Questions
How much does roll-up door weatherseal replacement cost on a shipping container in Ontario?
Material cost for a full three-zone replacement (bottom astragal, two side jambs, top header) on a standard 7-foot roll-up depends mostly on whether you specify EPDM or PVC bottom astragal and polypropylene or nylon brushes, with EPDM and nylon adding roughly 30% over the budget options. Labour is half a day for one person. The biggest swing on an installed price is whether you do it yourself or have a third party fit it in Ontario, since labour can roughly match the parts cost.
Can I replace just the bottom astragal and skip the side brushes?
Yes if the side brushes still spring back to within 80% of their original height when you press them. The bottom astragal accounts for the majority of door leaks, so a partial rebuild often gets you a dry container. Replace it as a single 7-foot piece, not patched sections.
What’s the difference between EPDM and PVC bottom astragal?
EPDM stays flexible down to -40°C and lasts 8-12 years outdoors. PVC glazes and splits below -10°C and lasts 3-5 years in an Ontario climate. EPDM costs about 30% more. For any container that lives outside year-round in Ontario, EPDM pays back the premium.
How long does a full three-zone rebuild take?
One person, three hours start to finish on a standard 7-foot door including diagnostic rain test. Two people, about ninety minutes. The first rebuild always takes longer because every step is new; the second one runs at full pace.
Do I need any special tools to install container roll-up door seals?
A 3/16-inch rivet gun, a drill with 3/16-inch bit, a hacksaw or aviation snips for cutting aluminum retainer, a tape measure, and silicone-based seal lubricant. No specialty tools. The kits ship with the fasteners.
Can I install brush seals myself, or do I need a professional?
Container roll-up door seal kits are designed for DIY install. The pre-punched retainers and supplied fasteners make it accessible to anyone comfortable with a drill and a rivet gun. The main risk is installing the side jamb brushes backwards or upside down, which a careful read of the kit instructions and a check of bristle direction prevents.
Why does my roll-up door still leak after I replaced all three seals?
Three usual suspects in order: a missed corner at the bottom-jamb transition where the astragal and side brush meet, a punctured curtain (the steel itself, not a seal), or a chassis racking issue putting the door out of square. The hose test isolates which one. Mark the wet spot from inside with tape and inspect.
Should the bottom astragal be a T-bulb or P-bulb profile?
Either works for a container roll-up. T-bulb gives a slightly larger compression footprint and is the more common choice for new installs. P-bulb compresses more easily and is preferred if your threshold is uneven. The retainer channels are interchangeable in most kits.
What if my container floor is uneven and the new astragal won’t seat evenly?
Add a threshold plate. A 1/8-inch steel plate welded across the bottom of the door opening gives the astragal a flat surface to seal against. Plates ship flat from most container suppliers for a modest add-on and weld on in twenty minutes with a stick or MIG welder.
Will replacing the seals improve the Wind & Watertight rating on my container?
Yes for practical purposes. A WWT-graded container with fresh seals will pass a fresh inspection. However, the IICL WWT certification is a point-in-time inspection, not a continuous rating, so the formal certificate is not transferred by seal replacement alone. The container is wind and watertight in fact whether or not a new certificate is issued.
Sources
- International Organization for Standardization. (2013). ISO 1496-1:2013, Series 1 freight containers, Specification and testing, Part 1: General cargo containers for general purposes. iso.org/standard/52831.html
- International Maritime Organization. (1972, as amended). International Convention for Safe Containers (CSC). imo.org
- Institute of International Container Lessors. (current). IICL Inspection Criteria for Steel Containers. iicl.org
- Transport Canada. (2025). Cargo Securement Standard 10, Containerized Cargo. tc.canada.ca
- Seashore Rubber. (2024). Guide for Shipping Container Door Seals: Fundamentals and Replacement. seashorerubber.com
Related Reading
- Roll-Up Door Spring Tension Shipping Container Ontario
- Shipping Container Roll-Up Doors in Ontario: The Complete Guide
- Customizing Your Shipping Container: Doors, Windows, and Modifications
- Shipping Container Maintenance: The Ontario Field Manual
- Used Shipping Container Buying Guide: Grades, CSC, and What to Walk Past