
Quick Answer: A container restaurant floor drain trench in Ontario runs a stainless steel slot drain along the full cookline plus a centre floor drain, sloped at 1 in 50 per Ontario Building Code Section 7. Plan the trench layout before the steel is cut, because retrofit drains in a 40ft container box are slow and costly. Real Brantford yards, real reviews (4.9 / 140+), real 1-3 day delivery. Family-operated since 1995.
In This Guide
- Why Do Floor Drains Decide the Whole Container Kitchen Build?
- Trench Drain or Centre Floor Drain: Which Does a Container Kitchen Need?
- What Slope Does the Ontario Building Code Require Inside an 8-Foot Box?
- What Does Reg 493/17 Require a Public Health Inspector to See?
- What Stainless Grate Material, Width, and Load Class Should a Cookline Use?
- How Do the Epoxy Floor, Coved Base, and Trench Edge Fit Together?
- Where Do the Cleanouts, Grease Interceptor, and Municipal Tie-In Go?
- Where Does Standing Water Actually Form in a Container Kitchen?
- How Do You Keep a Container Restaurant Drain From Freezing in an Ontario Winter?
- How Does Van Blanc Schedule the Drain Build Before the Container Ships?
- FAQs
Reading time: about 13 minutes.
Why Do Floor Drains Decide the Whole Container Kitchen Build?
A container restaurant floor drain is the first system to design and the last one you can move. In a 40ft container kitchen, the drain plan sets where the cookline, gas drops, and hood can sit, because each one references the trench. Lock the drain locations on paper before the steel is cut.
Most operators planning a container restaurant in Ontario think about kitchen layout first and drainage somewhere around the time the floor is already going down. That order is backwards. In a 320 square foot kitchen built inside a 40ft High Cube, the drain plan is the single decision that locks where every other system can live. Move the trench an inch and the cookline shifts, the gas drops shift, the hood penetration moves.
Christian LeBlanc, second-generation operator: “The first thing I ask a container restaurant customer is where the drains go, not where the stove goes. We have run the Brantford yard since 1995, and the kitchens that pass inspection on the first walk-through are the ones that drew the trench, the centre drain, and the grease trap before anyone cut a hole in the floor.”
The container box is 7 feet 8 inches wide on the inside. After insulation, vapour barrier, and finish wall, you have roughly 7 feet of usable width and 38 feet of usable length. The trench runs along the long axis, the centre floor drain catches general washdown, and the slope geometry has to land both into a tie-in that exits through a side wall or the floor steel. None of that works unless the openings are prepared before the container ships.
Paul has watched too many container restaurant projects stall because drainage came last. The fix is the same every time: we sit down with the customer and the wider shipping container kitchen build in Ontario on paper before any steel is cut. The plan tells the welder where to cut, the plumber where to bring in the rough-in, and the flooring crew where the slope lands.
Why this matters in Brantford and across Ontario
Public health inspectors read drainage plans the same way everywhere: floor surface, slope, trench coverage, grease interceptor placement, cleanout access. A container restaurant gets the same scrutiny as a sit-down dining room. Build the drain right the first time and the inspection is short. Build it wrong and you are re-cutting steel after the fact.
Trench Drain or Centre Floor Drain: Which Does a Container Kitchen Need?
A container kitchen needs both a trench drain and a centre floor drain. The trench handles the cookline. The centre drain handles everything else. Run only one and you leave a zone where water sits.
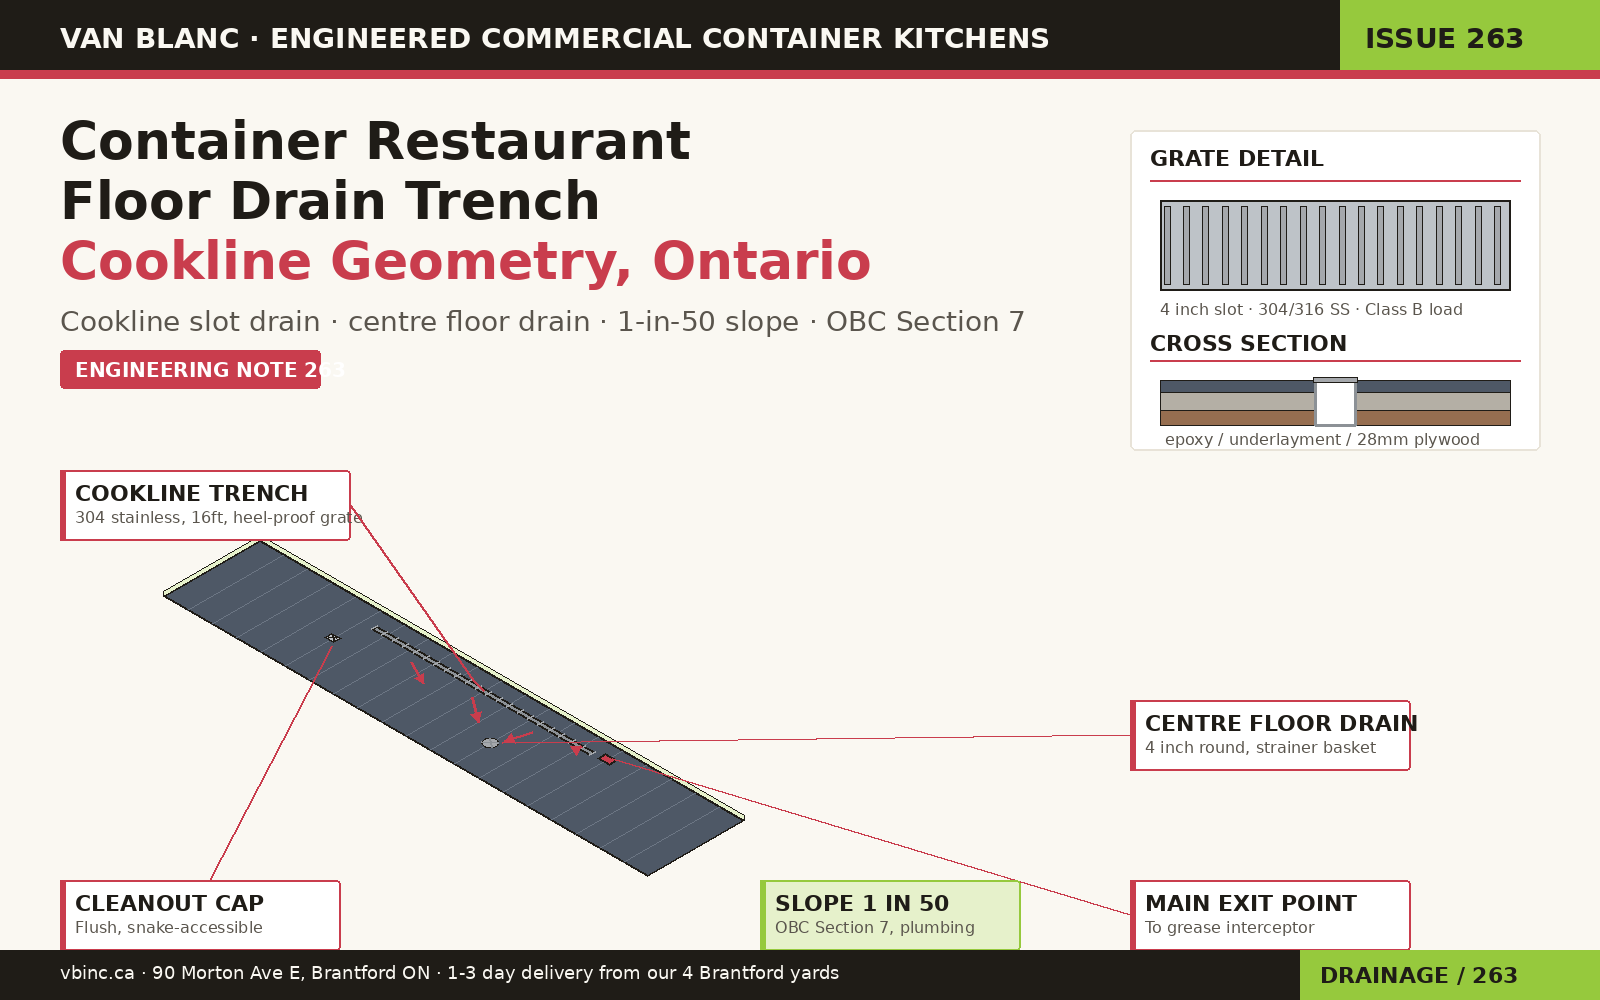
The trench drain is a long, narrow stainless channel set flush into the floor with a removable grate. It runs the full cookline, typically 14 to 18 feet for a six-burner range, flat-top griddle, fryer bank, and salamander. Grease, splatter, end-of-shift washdown, and pre-rinse spray all land in the channel. Without a trench, every drip puddles until someone mops it, which never happens fast enough in a Friday-night rush.
The centre floor drain sits in the prep zone or near the dish station. It is a 4-inch round stainless drain with a removable strainer basket. It catches the spills that do not happen on the cookline: a knocked-over pot of stock, an ice machine line leak, the hourly mop bucket dump, dish-pit overflow. One trench and one floor drain together cover the full kitchen footprint without leaving a zone where water can sit.
| Feature | Cookline trench drain | Centre floor drain |
|---|---|---|
| Zone covered | Full cookline length | Prep and dish zone |
| Shape | Long stainless slot channel | 4-inch round point drain |
| Catches | Grease, splatter, washdown, pre-rinse spray | Spills, mop water, line leaks, overflow |
| Typical length or size | 14 to 18 ft (40ft build) | Single 4-inch outlet |
| Grate or cover | Removable heel-proof slot grate | Removable strainer basket |
| Cleaning | Lift the full grate, flush the channel | Pull the basket, clear the trap |
Container kitchen drain layout (Van Blanc operational standard)
For a 40ft High Cube container restaurant, the standard drain layout we build is one 4-inch wide stainless slot drain running 16 feet along the cookline (centred on the long axis, set against the cooking-equipment wall), plus one 4-inch round centre floor drain positioned roughly 24 feet from the service end (closer to the dish or prep zone). Both tie into a single 4-inch ABS or cast-iron main, sloped 1 in 50 to a grease interceptor outside the container envelope. The whole system sits below the finished epoxy floor.
The 20ft container restaurant build (closer to a kiosk format) gets a shorter trench, typically 8 to 10 feet, plus a single centre drain. The principle is the same. Cookline trench, general-purpose centre drain, single main out.
What Slope Does the Ontario Building Code Require Inside an 8-Foot Box?
Ontario Building Code Section 7 (O. Reg. 332/12) sets the slope rule for a container restaurant floor drain. Pipes 3 inches or less must slope at least 1 in 50 downward in the direction of flow. A lesser slope is permitted only where gravity flow can be maintained at no less than 0.6 metres per second. The container restaurant does not get an exemption.
What changes inside the container is how little vertical room you have to land that slope. The interior finished floor sits about 2 inches above the steel deck once you add underlayment, drain pan, and epoxy. Sixteen feet of trench at 1 in 50 needs roughly 4 inches of fall. That leaves only 2 inches of headroom for the centre drain tie-in and the exit pipe. The geometry is tight.
Plan the slope geometry on paper first
Before any steel is cut, draw the slope diagram. Mark the trench high point, the trench low point, the centre drain elevation, the main exit point, and the elevation of the grease interceptor inlet outside the box. Confirm that 1 in 50 lands at the exit with at least an inch of clearance below the steel deck. If the geometry does not work, you raise the finished floor or you exit the main through a side wall rather than the floor. Both are fine. Discovering the problem after the trench is welded in is not.
The 0.6 m/s gravity flow exception is rarely needed in a container restaurant. Pipe runs are short enough that 1 in 50 lands in almost every layout. Where it gets used is on retrofit jobs converting an existing container that was not planned for drainage. That is the most expensive situation to fix, because the floor has to come up.
What Does Reg 493/17 Require a Public Health Inspector to See?
Ontario Regulation 493/17 (Food Premises) under the Health Protection and Promotion Act sets the public-health rules every container restaurant has to satisfy. It cross-references the Building Code for construction, then adds operational requirements: floors smooth, non-absorbent, easy to clean; food contact surfaces sanitisable; pest exclusion built in.
For drainage specifically, the inspector wants to see:
- Floor surfaces sloped to drains, no ponding zones
- Trench grates removable for cleaning, no sharp debris-catching edges
- Strainer baskets in place at every drain inlet
- Cleanouts accessible from inside the kitchen
- Grease interceptor sized for the cookline (typically 750 to 1,500 litres)
- Backflow prevention on any drain that could receive sewer backup
- Sealed wall-to-floor joint, epoxy cove base preferred
The walk-through is short when the drain is built right. The inspector pulls the grate, checks the slope, opens the cleanout, looks at the grease trap, and signs off. Maybe ten minutes if the build is correct. Questions only start when something is missing.
What Stainless Grate Material, Width, and Load Class Should a Cookline Use?
A container cookline trench grate has to survive what a stainless grate built for a patio never would. The grate sees fast foot traffic in clogs, rolling rack traffic, dropped pots, and constant exposure to acidic and alkaline cleaning chemicals. The trench channel and grate are part of the yard conversion work we finish before delivery, so the spec is set during the build, not bought off a shelf afterward.
For a container cookline we specify 304 stainless (316 for seafood or pickling operations), a heel-proof slot pattern with openings 6mm or less, and a load class of at least Class B per EN 1433. Class B is overkill for foot traffic, which is the point. Lighter grates dish over time and stop sitting flush, which creates an edge that traps food waste where the cleaner cannot reach.
Trench grate spec checklist
- Material: 304 stainless minimum, 316 stainless for high-chloride kitchens
- Width: 4 inch slot drain is standard for cookline; wider (6 to 8 inch) for high-volume dish areas
- Opening pattern: Heel-proof, slot width 6mm or less, smooth radius edges
- Load class: Class B per EN 1433 (or equivalent)
- Removability: Lifts out without tools for daily cleaning
- Channel body: Fully welded 304 stainless, smooth interior, radius corners
- Strainer: Integrated basket strainer at every floor outlet
The cheap-grate trap catches most first-time operators. A pressed steel grate costs a quarter of a stainless grate. It rusts inside six months and fails load tests by year one. Replacement plus downtime costs more than the stainless premium would have. Pay for it once.
How Do the Epoxy Floor, Coved Base, and Trench Edge Fit Together?
The floor in a container restaurant is a layered system that the trench has to lock into. From the steel up: container floor (28mm marine plywood treated for moisture), a moisture barrier, cement underlayment poured to the slope profile, then commercial epoxy coating designed for food service. If you want the detail on the coating itself, we cover the chemistry and prep in our guide to sealing a container floor for wet, heavy use. The cove base runs the epoxy 4 to 6 inches up the wall in a continuous radius so there is no seam at the wall-to-floor joint where water can sit.

The trench edge is where the system most often fails. A channel set flush into the underlayment creates two transition lines, both potential failure points if the epoxy is not detailed correctly. The right detail is to run the epoxy down into the channel and terminate it against the stainless lip with chemical-resistant sealant. The wrong detail is to butt the epoxy to the edge with no termination, which lets water wick under the coating from day one.
The cement underlayment carries the slope. Epoxy is too thin to build slope on its own; it follows the substrate. Plan slope at the underlayment stage, confirm with a level before epoxy goes down, and the floor drains correctly for the life of the kitchen.
Where Do the Cleanouts, Grease Interceptor, and Municipal Tie-In Go?
The cleanouts, grease interceptor, and municipal tie-in sit on a single path out of the kitchen. Inside the container, the cookline trench and the centre drain merge into a single 4-inch main. That main exits the container through the side wall at low elevation, or down through the floor steel if the container sits on a permanent foundation pad with a designed vertical drop. Outside, the main runs into a grease interceptor sized for the cookline, then continues to the municipal sanitary connection.
The grease interceptor is not optional. Most Ontario municipalities require one on any commercial food service connection. Sizing depends on the cookline: a 14-foot cookline with a fryer, griddle, and range typically calls for 750 litres; an 18-foot cookline with two fryers and a wok station may need 1,000 to 1,500 litres. Undersized interceptors back up, which means cookline drainage backs up into the kitchen, which means the kitchen closes.
Locate the grease interceptor before the container sets down
The interceptor sits below grade in a concrete pit, with the lid at finished grade for service access. The pit has to be in place before the container is set, because cutting the foundation pad to install one afterward is the kind of expensive surprise that turns a profitable build into a sunk-cost project. Coordinate with the site contractor early.
Cleanouts get installed at every direction change in the main, plus one inside the kitchen for the trench cleanout. The cap sits flush in the floor with a screw-down stainless cover. When a line clogs, the cleanout is what lets you snake it in twenty minutes rather than pulling up floor sections.
Paul LeBlanc, owner: “The drain plan is the first conversation we have with anyone building a container restaurant. We have been delivering shipping containers since 1995, and the kitchen builds that work are the ones where the trench, the centre drain, the grease trap, and the cleanout were all drawn before the steel was cut. The builds that struggle are the ones that treat drainage like a finish item.”
Where Does Standing Water Actually Form in a Container Kitchen?
Standing water in a container kitchen forms first at the dish station, and the pre-rinse hose is the biggest source of unplanned water there. A commercial pre-rinse sprayer puts out 1.6 to 2.0 gallons per minute (6 to 7.5 litres per minute). Run it 30 seconds on a sheet pan and you put roughly 4 litres on the floor if any of it misses the dish-pit sink. Multiply by 200 rinse cycles per service and the floor handles real volume.
The centre floor drain has to be sized and located to catch overspray and counter-runoff. We position it within 3 feet of the pre-rinse station on the downslope side of the dish counter, with the trench running back toward the cookline picking up anything that travels further. Standing water is a slip hazard, a bacterial risk, and a public-health flag. Build the layout for the busiest service hour, not the average.
How Do You Keep a Container Restaurant Drain From Freezing in an Ontario Winter?
A container restaurant drain stays frost-free two ways: bury the exit run below frost, or heat-trace it. Frost depth can hit 4 feet in southern Ontario and 6 feet or more in the north. The main that exits the container has to land below frost or be heat-traced.
- Below-frost installation: Trench the drainage line to local frost depth, bed in pea gravel, run cast iron or schedule 40 PVC to the interceptor and on to the municipal connection. Standard for permanent installations.
- Heat-traced shallow installation: For mobile or seasonal builds where the tie-in cannot go below frost, electric heat-trace cable runs along the pipe under insulation, monitored by a low-temp sensor. Works, but adds load and a failure point.
The trench and centre drain inside the container are heated by the kitchen itself; the freeze risk is the exit pipe and the connection run. Plan for it before the slab pours.
How Does Van Blanc Schedule the Drain Build Before the Container Ships?
Van Blanc schedules the drain build in a fixed order, and the container restaurant cookline trench and centre floor drain are the first systems committed to steel. The sequence runs like this:
- Drawing review: Customer brings or develops a floor plan showing cookline equipment, dish station, prep zone, service window. We mark drain locations on the plan and confirm slope geometry on paper.
- Steel cut sheet: Once the drain plan is approved, the welder cuts the openings in the container floor and side wall for the trench, centre drain, and main exit. This happens at our Brantford yard before the container ships.
- Underlayment and slope: Cement underlayment is poured to the slope profile. This is the step most often rushed by general contractors; we hold the customer to a slope check with a four-foot level before the underlayment cures.
- Drain bodies set: Stainless trench channel and centre drain body installed flush, sealed at the underlayment edge, capped against debris during the rest of the build.
- Floor coating: Commercial epoxy floor coating goes down with cove base, terminated correctly at the trench lip.
- Plumbing tie-in: Drain main connects to the grease interceptor and municipal sanitary at the site, after the container is set on its foundation pad.
- Inspection prep: Public health inspector and building inspector walk-through. Trench grate removed, strainer baskets in place, cleanouts opened, grease trap shown.
The sequence matters because the drain is the foundation under everything else in the kitchen, and it all starts with the right base unit. Most of our restaurant builds begin with a 40ft High Cube from the containers we keep in the Brantford yard. Get the drain right at step one and the rest of the build runs clean. Get it wrong at step one and every later step inherits the problem.
Worth the drive to see a container kitchen build in person
Customers planning container restaurants regularly drive to our Brantford yard at 90 Morton Avenue East to walk an in-progress build and see the trench drain set into the underlayment before the epoxy goes down. The view tells you more in ten minutes than a hundred drawings can. Worth the drive for unbeatable quality and 30 years of family customer service.
Ready to price your container?
Tell us the size and your postal code and we’ll send back an honest, all-in number, container, delivery, and placement, usually within 1-3 days. No pressure, no mystery fees.
Family-run in Brantford since 1995 · 200+ containers in stock · 4.9★ across 140+ Google reviews · every box graded by a person, walk it before it lands.
Frequently Asked Questions
Does Ontario Reg 493/17 require a trench drain specifically?
The regulation requires food premises floors to be sloped to drains, free of standing water, smooth, and easy to clean. It does not name the trench by product type, but inspectors expect cookline drainage that handles the volume, and trench drains are the standard solution.
How long is the cookline trench in a 40ft container restaurant?
Typical builds run 14 to 18 feet along the long axis, centred against the cooking-equipment wall. A six-burner range, flat-top, twin fryers, and salamander usually calls for the full 18 feet. A smaller setup with a four-burner and one fryer lands closer to 12 feet.
Can we use a single floor drain instead of both a trench and a centre drain?
You can, but it performs worse. A single round drain has a small catch radius. A lesser slope is permitted only where gravity flow can be maintained at no less than 0.6 metres per second. For practical container restaurant builds, 1 in 50 is the design target and it is achievable in most layouts.
Do we need a grease interceptor for a container restaurant?
Yes. Most Ontario municipalities require a grease interceptor on any commercial food service drainage connection. Sizing depends on the cookline volume, typically 750 to 1,500 litres for a small-to-mid container restaurant. The interceptor sits below grade outside the container, in a concrete pit accessed by a service lid at finished grade.
What stainless grade should we specify for the trench grate?
304 stainless steel is standard for general commercial kitchen use. 316 stainless is the upgrade for kitchens with heavy chloride exposure, such as seafood operations, pickling, or saline-cleaning chemistries. The cost difference is modest and the longer service life makes 316 worth it where chlorides are part of the daily routine.
Can the drain main exit through the container floor or does it have to exit through the side wall?
Either works. Exit through the floor steel is cleaner when the container sits on a permanent foundation pad with a designed vertical drop. Side-wall exit is the standard for builds on a simple slab. Both meet code, pick the one that fits the site geometry.
How does freezing affect a container restaurant drain in an Ontario winter?
The drain piping inside the container stays warm because the kitchen itself stays warm. The risk is the exit run from the container to the interceptor and onward to the municipal connection. Either bury the line below local frost depth (typically 4 feet southern Ontario, deeper north) or install heat-trace cable with insulation on a shallow run. Plan for it at the foundation stage.
What is the cleanout requirement for a container kitchen drain?
Cleanouts are installed at every direction change in the drain main and at any point where a snake might need to enter the line. Inside the kitchen, a flush stainless cleanout cap sits in the floor near the trench end so the cookline trench can be cleared from above. Outside the kitchen, additional cleanouts at the interceptor and at any line turn make periodic maintenance possible without excavation.
How long does the drainage install take in a 40ft container restaurant build?
From steel cuts through final tie-in to municipal sanitary, typically 1-3 days of dedicated work spread across the build timeline. Pre-cut work happens at our Brantford yard before the container ships. Underlayment, drain bodies, and floor coating happen after the container is set. The plumbing tie-in is the last step, coordinated with the site contractor.
Sources
- Government of Ontario. (2017). O. Reg. 493/17: Food Premises, under the Health Protection and Promotion Act. ontario.ca/laws/regulation/170493
- Government of Ontario. (2024). O. Reg. 332/12: Building Code, Section 7 (Plumbing). ontario.ca/laws/regulation/120332
- International Organization for Standardization. (2022). ISO 6346:2022 Freight containers, Coding, identification and marking. iso.org/standard/82754.html
- Vodaland Canada. (2024). Commercial Kitchen Drains and Floor Drainage Solutions: Trench vs Slot Systems. vodaland.ca/blogs/case-studies/best-commercial-kitchen-drains
- Extreme Epoxy Coatings. (2024). Trench Drains for Commercial Kitchens. extremeepoxycoatings.com/trench-drains-commercial-kitchens
Reach Van Blanc in Brantford
We have been supplying shipping containers across Ontario since 1995. Our warehouse is at 90 Morton Avenue E in Brantford, and we deliver right across the province on a cash-on-delivery basis. No surprise fees, no chase-the-paperwork.
Van Blanc Ent. Inc., 90 Morton Ave E Unit 1B, Brantford, ON N3R 7J7, +1 888-509-6658
Planning a container restaurant with a proper cookline trench and centre floor drain? Walk our Brantford yard, see an in-progress build, and we will mark up your floor plan with the drain locations before the steel is cut.
Placement requirements vary by municipality. A quick call to your local planning office before delivery is the easiest way to confirm what works for your property.